What you put in, you'll get back ten fold
***** THIS IS VERY IMPORTANT TO THE SITE AND HELPING YOU,OTHERWISE IT CLOSES AND ALL THIS ON LINE GARAGE IS GONE FOR GOOD*****

Greetings and welcome to menders, this site was built for every owner that might need her to help keep those bills low and also keep them on the road where they belong, she is run by very passionate enthusiasts owners for passionate enthusiastic owners, see her like a on line garage, there is a lot of tech stuff hopefully explained for everyone to use, if there is something you cannot get your head around, or you feel that there is a strong walk through guide missing that needs creating by one of us or from yourselves, please let us know, we are also on false book and youtube, which as short tech vids to help, and again if you feel there is a vid that would help please get it touch.
the menders is free, but like everything there is a cost to run things and bills( we are just happy its not a heating cost), so if we have saved you hundreds, please throw a small donation in the pot so we can keep on going to carry on helping others in the same way .

*** we are currently looking for a sponsor for this year, so if you have the passion and can see this sites worth to everyone , please get in touch and step forward to help***

And thank heavens that we are now on the way back up the brighter ,warmer longer days, "come on summer", and lets see those project builds.


M-m

Mk 1 electric window switch repair

User avatar
Mazda Mender
Site Admin
Posts: 15090
Joined: Tue Dec 06, 2011 6:18 pm
Location: Pie land, in the glen of Wiganshire
Contact:

Mk 1 electric window switch repair

Postby Mazda Mender » Wed Feb 12, 2014 11:29 pm

*****Submitted by JohnnyKerm******


Other than a faulty motor and cables, a faulty switch with grubby contacts can often be the reason your electric windows won't work. This is a guide on how to remove the unit and clean up the contacts.

1. You need to take off the gear knob and remove the centre console by unscrewing 5 cross head screws. 2 are located at the front near the dash on the left and right, 1 under the middle storage tray / ashtray / bin area and 2 inside the locking compartment (leave the fuel lever alone, but remove the two screws).

2. The whole centre console can now be removed. There are two electrical connections that need to be disconnected. Once you disconnect these, pull the whole console towards the dash (taking care not to get it caught on the fuel lever). Note that if you're car is fitted with any sort of alarm, there may be additional connecters to unplug.

3. You can now flip over the centre console and unscrew the 3 screws that attach it to the console.

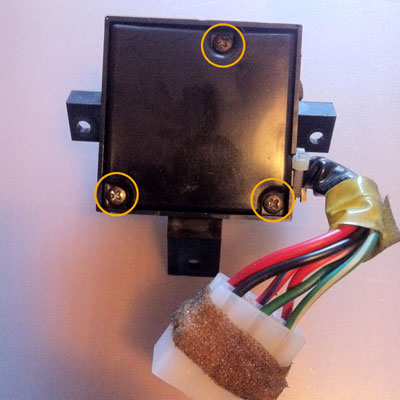
4. Once you have disconnected the switch unit, remove the 3 screws underneath
Image

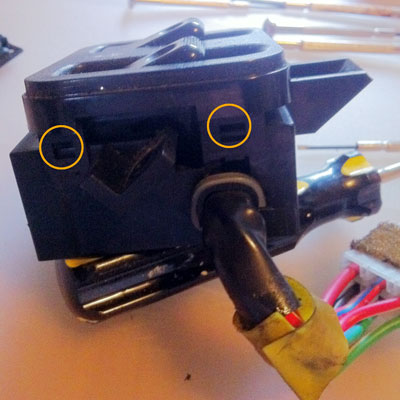
5. Release the 4 tabs with a small flat head screwdriver (careful as they may be brittle)
Image

Image
6. Remove the rocker switches by forcing them off the hinge lugs

Image

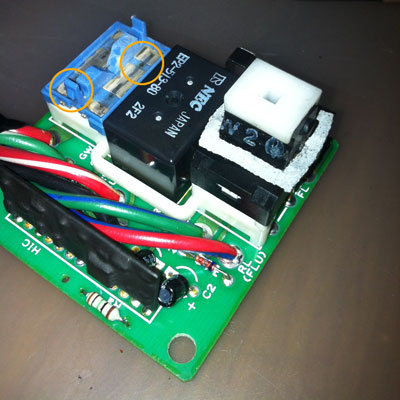
7. You will then be able to pop off the top and see all the switch workings (be careful and gentle as there are many components that can fly off in all directions).

8. Pop the top the metal rockers (also being careful not to snap any of the plastic) Then give the copper contacts a good scrape and clean with a wire brush as there will probably be a lot of black sooty build up.

Image

9. Repeat step 8 for the other switch's copper contacts.

Putting it all back together.

10. Prise the top of the component cover (or whatever it's called) back on top of the copper components.

11. Pop the component board back into the housing and then replace the rocker switch surround.

12. Prise the rocker switches back on their hinge lugs (being careful again not to snap any brittle plastic).

13. Place the switch assembly back into the console and install the 3 screws that were removed earlier.

14. Place the console back into the car. Slide it back over the fuel filler cap release lever first, then down over the gearshift. Before seating fully, reconnect the two electrical connections that were removed earlier.

15. Seat the console fully, then install the five large screws that were removed earlier. Install the middle storage tray / ashtray / bin. Install the gearshift knob.

Thanks to MM himself for the tips.


*****Submitted by JohnnyKerm******
The Disclaimer:-
This post is a natural product made from recycled electrons. The slight variations in spelling and grammar enhance its individual character and beauty and in no way are to be considered flaws or defects, the articles/answers/comments are provided for information purposes and they are not intended to substitute informed professional advice, I or mazdamenders.net cannot personally be hold responsible for any damage occurred from following this procedure or any injuries from it. Proceed at your own risk.


Mk 1 Eunos 93 black V.S II 1.8 ,
Mk 2 .1/4 Roadster 99 black & gold V.S 1.8 .
Mk 1 Eunos 90 1.6 soul red ..f/ build
MK 2.1/4 Blue V.S Roadster 1.8 99 ..
MK1 1.8 ,white import.. (Ashleighs)
MK1 1.6 yellow J ltd import.f/build
MK 1 1.8 black Tokyo Ltd..f/build


http://www.mx5oc.co.uk/ http://www.mx5nutz.com/forum/ http://miata.net/ http://www.autolinkuk.co.uk/

Return to “Electrics”

Who is online

Users browsing this forum: No registered users and 4 guests