What you put in, you'll get back ten fold
***** THIS IS VERY IMPORTANT TO THE SITE AND HELPING YOU,OTHERWISE IT CLOSES AND ALL THIS ON LINE GARAGE IS GONE FOR GOOD*****

Greetings and welcome to menders, this site was built for every owner that might need her to help keep those bills low and also keep them on the road where they belong, she is run by very passionate enthusiasts owners for passionate enthusiastic owners, see her like a on line garage, there is a lot of tech stuff hopefully explained for everyone to use, if there is something you cannot get your head around, or you feel that there is a strong walk through guide missing that needs creating by one of us or from yourselves, please let us know, we are also on false book and youtube, which as short tech vids to help, and again if you feel there is a vid that would help please get it touch.
the menders is free, but like everything there is a cost to run things and bills( we are just happy its not a heating cost), so if we have saved you hundreds, please throw a small donation in the pot so we can keep on going to carry on helping others in the same way .

*** we are currently looking for a sponsor for this year, so if you have the passion and can see this sites worth to everyone , please get in touch and step forward to help***

And thank heavens that we are now on the way back up the brighter ,warmer longer days, "come on summer", and lets see those project builds.


M-m

1995 G-Limited ***RESTORATION***Rebuild

A place for members to show off their pride and joy. Also room to document your projects.
John&Luke
Serial Poster
Posts: 395
Joined: Sat Jul 13, 2013 8:25 am

Re: 1995 G-Limited ***RESTORATION***Rebuild

Postby John&Luke » Sun Nov 29, 2020 10:40 pm

Great work :handgestures-thumbup: :handgestures-thumbup: :handgestures-thumbup:
1996 Mk1 Classic Red 1.6 sorted
1995 Mk 1 White 1.6 in need of TLC
2015 Mk1 1.8 Exocet Mk1 on steroids
User avatar
blackyb
Moderator
Posts: 1525
Joined: Tue Sep 17, 2013 8:41 pm
Location: Scarborough

Re: 1995 G-Limited ***RESTORATION***Rebuild

Postby blackyb » Sun Nov 29, 2020 11:34 pm

She will as if she has just rolled off the production line by the time your done.
1993 1.6 Eunos Roadster (gone)
1998 UK Mk 2 1.6 (gone)
2003 1.8 SVT Sport (shouldnt have sold it)
1991 1.6 Eunos Roadster with a bit of bling.

Life is a journey, best travelled topless in an MX5!!
User avatar
Lumphammer
Moderator
Posts: 316
Joined: Thu Nov 15, 2012 10:57 pm

Re: 1995 G-Limited ***RESTORATION***Rebuild

Postby Lumphammer » Sat Dec 05, 2020 9:26 pm

Put the diff back in with the PPF as one unit, got everything torqued etc

diff_in.jpg
diff_in.jpg (421.27 KiB) Viewed 8846 times


Started on the engine, took the head off to see what the state of it was. A load of cr*p from plug number 3 fell in, hoovered it out

01_head_off.jpg
01_head_off.jpg (444.38 KiB) Viewed 8846 times


Looking at the state of the head gasket I'd lost confidence in how healthy it was. I knew it had had a tough previous life and decided to take it to bits fully

crank_out.jpg
crank_out.jpg (434.74 KiB) Viewed 8846 times


rods_out.jpg
rods_out.jpg (515.89 KiB) Viewed 8846 times


Really not that great, main bearings scored pretty bad

bearing_scored.jpg
bearing_scored.jpg (355.43 KiB) Viewed 8846 times


Crank scoring was less, i would guess 1-2 thou. I can linish that out hopefully

crank_scored.jpg
crank_scored.jpg (329.89 KiB) Viewed 8846 times


Got the measuring sticks out

measure_things.jpg
measure_things.jpg (467.18 KiB) Viewed 8846 times


The good news is that the ovality and taper is within spec and it hasn't been rebored previously

But this sh*te concerns me

weird_shite.jpg
weird_shite.jpg (329.84 KiB) Viewed 8846 times


My friend feels it might hone out but if not it'll be a second hand VVT engine and rebuild the bottom end of that with the 9:1 pistons from this - which are fortunately in very good condition
User avatar
Lumphammer
Moderator
Posts: 316
Joined: Thu Nov 15, 2012 10:57 pm

Re: 1995 G-Limited ***RESTORATION***Rebuild

Postby Lumphammer » Wed Dec 09, 2020 4:52 pm

Unfortunately the marking is corrosion, probably from being sat so long outside, it's deep enough that the block would need reboring rather than just honing :sad: I could put the money into this block but when you add together the cost of the parts just to get it within spec again it's just not worth it. Might as well get another secondhand engine.

The engine i've bought is a 2002 VVT 1.8 with 64,000 miles on it from a car that's done 3-5k miles every year. Ive checked the MOT history so I'm hopefull that its a good one :think:

In the mean time I've been making a modification for the fuel rail. The VVT engine uses a returnless system with the pressure regulator in the tank whereas the MK1 has pump in the tank and the FPR on the fuel rail before it returns to the tank.

I have a spare VVT head I bought from some random bloke on the internet for throwaway price at the start of summer, so this is the MK1 head (left) next to a VVT head.

two_heads.jpg
two_heads.jpg (455.29 KiB) Viewed 8779 times


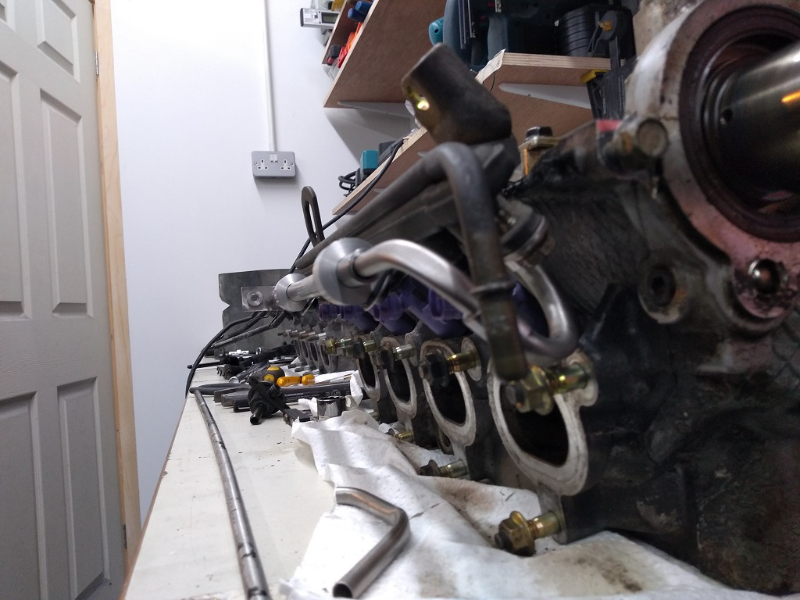
You can't simply swap over the fuel rails because the holes don't line up and I think the MK1 FPR gubbins might foul on the VVT's bigger "square top" manifold.

mk1_rail_on_vvt_head.jpg
mk1_rail_on_vvt_head.jpg (450.76 KiB) Viewed 8779 times


There's a "pulse dampener" on the VVT fuel rail which has the same fitment pattern as the MK1 FPR but there isn't enough space to get the MK1 FPR in between the head and the rail - so you can't simply swap the FPR with the pulse dampener

I've found various methods on the internet of how people do this on "VVT swaps" and the common thing appears to be to use a MK2 1.8 fuel rail with the MK1 FPR placed upside down on the end of the rail - I can't think of anything wrong with this but I don't have a MK2 1.8 fuel rail, there wasn't any on eBay and I'm fed up of buying stuff so decided to make something.

My normal car is a MK2.5 VVT, there's not a lot of space up at the front of the fuel rail at all but there's a good amount at he back, especially as I won't be using any of the EGR clutter

vvt_clearance_back.jpg
vvt_clearance_back.jpg (453.68 KiB) Viewed 8779 times


After much head scratching and messing about I've come up with this idea - Make a fitting to go on the end of the VVT fuel rail where the pulse dampener would sit, run a pipe around to the back and stick the MK1 regulator there and make it rigid enough that it doesn't vibrate / bend etc

parts.jpg
parts.jpg (359.69 KiB) Viewed 8779 times


The alu fittings lockate in the rectangular holes where the plastic cable tray clips and hold the 2mm wall, 12mm OD hydraulic stainless tube which carries the fuel but also acts as a structural support for the MK1 FPR

mock_up_1.jpg
mock_up_1.jpg (379.02 KiB) Viewed 8779 times


Decent clearance on the injectors, manifold is close but I think will fit OK

mock_up_2.jpg
mock_up_2.jpg (461.52 KiB) Viewed 8779 times


MK1 FPR in an upright position at the end of the rail, the vacuum reference points towards the manifold which is nice

mock_up_3.jpg
mock_up_3.jpg (397.48 KiB) Viewed 8779 times


All the parts are stainless and will be brased together when the replacement engine arrives. I don't want to chance it now in case there's something I forgot about. Need to get a couple of 8mm ID x 2mm thick viton o-rings for the seals.

I'll be chopping off the existing "b**tard clip" on the VVT fuel rail and brasing on a MK1 style bead rolled fitting too
Last edited by Lumphammer on Wed Dec 09, 2020 8:56 pm, edited 1 time in total.
User avatar
Lumphammer
Moderator
Posts: 316
Joined: Thu Nov 15, 2012 10:57 pm

Re: 1995 G-Limited ***RESTORATION***Rebuild

Postby Lumphammer » Wed Dec 09, 2020 8:53 pm

Had a go at brasing one of the parts, haven't done any for a while. Came out good - 55% silver rod

brasing.jpg
brasing.jpg (374.62 KiB) Viewed 8772 times


Will pressure test it when it's all together
User avatar
Mazda Mender
Site Admin
Posts: 15089
Joined: Tue Dec 06, 2011 6:18 pm
Location: Pie land, in the glen of Wiganshire
Contact:

Re: 1995 G-Limited ***RESTORATION***Rebuild

Postby Mazda Mender » Wed Dec 09, 2020 10:51 pm

:text-goodpost: :handgestures-thumbup: :coffee:
M-m
The Disclaimer:-
This post is a natural product made from recycled electrons. The slight variations in spelling and grammar enhance its individual character and beauty and in no way are to be considered flaws or defects, the articles/answers/comments are provided for information purposes and they are not intended to substitute informed professional advice, I or mazdamenders.net cannot personally be hold responsible for any damage occurred from following this procedure or any injuries from it. Proceed at your own risk.


Mk 1 Eunos 93 black V.S II 1.8 ,
Mk 2 .1/4 Roadster 99 black & gold V.S 1.8 .
Mk 1 Eunos 90 1.6 soul red ..f/ build
MK 2.1/4 Blue V.S Roadster 1.8 99 ..
MK1 1.8 ,white import.. (Ashleighs)
MK1 1.6 yellow J ltd import.f/build
MK 1 1.8 black Tokyo Ltd..f/build


http://www.mx5oc.co.uk/ http://www.mx5nutz.com/forum/ http://miata.net/ http://www.autolinkuk.co.uk/
User avatar
blackyb
Moderator
Posts: 1525
Joined: Tue Sep 17, 2013 8:41 pm
Location: Scarborough

Re: 1995 G-Limited ***RESTORATION***Rebuild

Postby blackyb » Thu Dec 10, 2020 9:47 am

This is taking mending to a whole new level.

Excellent write up and great to follow.
1993 1.6 Eunos Roadster (gone)
1998 UK Mk 2 1.6 (gone)
2003 1.8 SVT Sport (shouldnt have sold it)
1991 1.6 Eunos Roadster with a bit of bling.

Life is a journey, best travelled topless in an MX5!!
User avatar
GlennyGills
Moderator
Posts: 630
Joined: Tue Jul 10, 2012 8:13 pm
Location: Reading

Re: 1995 G-Limited ***RESTORATION***Rebuild

Postby GlennyGills » Thu Dec 10, 2020 10:40 am

Very enjoyable build
'96 Gleneagles MeisterR Coilovers - engine bling stainless mx5parts full exhaust
User avatar
Lumphammer
Moderator
Posts: 316
Joined: Thu Nov 15, 2012 10:57 pm

Re: 1995 G-Limited ***RESTORATION***Rebuild

Postby Lumphammer » Sun Dec 27, 2020 7:35 pm

Got held up on parts for the engine unfortunately so did a bit today on the brakes

These are MK2.5 sport brakes, I bought them secondhand "condition unknown" for something like £80, i can't remember exactly. They freed up alright and were probably useable as-is but I shot blasted them and they've had 4 coats of brake caliper paint - two black and two silver. I used different colours because you can more easilly see bits you've missed.

The slider pins are all the originals, they had virtually no corrosion on the sliding parts but were a bit worn so they were shot blasted, polished and sent of with the rest of the plating bits many months ago.

I used a caliper rebuild kit from Frentec (eBay) which i think is very complete and good in quality, the cost was around £65.

I think all in they owe me about £150 plus a bit of effort.

fronts.jpg
fronts.jpg (386.13 KiB) Viewed 8193 times


rears.jpg
rears.jpg (390.53 KiB) Viewed 8193 times


I've not rebuilt a caliper fully before but I would highly recommend it to anyone that needs to, it's very easy. There is a video on YouTube from bofi racing which is very helpful.
User avatar
Lumphammer
Moderator
Posts: 316
Joined: Thu Nov 15, 2012 10:57 pm

Re: 1995 G-Limited ***RESTORATION***Rebuild

Postby Lumphammer » Wed Dec 30, 2020 7:00 pm

Took the starter motor to bits because... ?

Thought i'd put a few pictures up because it's quite interesting inside. It has a planetary reduction gearbox which I didn't expect. Also didn't expect the ring gear to be glass reinforced plastic - but it works and makes much more sense as to why the later MK2/2.5 starter is much smaller than the MK1 starter which is direct drive

starter_bits.jpg
starter_bits.jpg (314.47 KiB) Viewed 8146 times


The throwout gear and pinion that engages with the flywheel has a one way bearing built into it. They're quite interesting because you don't come across them much. I assume it's there to allow the starter to freewheel against the engine rotation while the pinion retracts. If anyone want to take one apart the only difficult bit is getting the c-clip to pop back into the retaining collar when reassembling (lower left)

I cleaned everything up and reassembled it with lithium based moly grease, wasn't sure how tolerant the plastic was of normal grease.

starter_gearbox.jpg
starter_gearbox.jpg (278.83 KiB) Viewed 8146 times


There was tons of meat left on the bushes so painted it up and put back together

starter.jpg
starter.jpg (286.46 KiB) Viewed 8146 times


Looks a bit better than the usual 15 year old condition :-D

starter_other.jpg
starter_other.jpg (376.25 KiB) Viewed 8146 times
User avatar
Mazda Mender
Site Admin
Posts: 15089
Joined: Tue Dec 06, 2011 6:18 pm
Location: Pie land, in the glen of Wiganshire
Contact:

Re: 1995 G-Limited ***RESTORATION***Rebuild

Postby Mazda Mender » Thu Dec 31, 2020 9:56 am

:text-goodpost: :handgestures-thumbup: :coffee:
M-m
The Disclaimer:-
This post is a natural product made from recycled electrons. The slight variations in spelling and grammar enhance its individual character and beauty and in no way are to be considered flaws or defects, the articles/answers/comments are provided for information purposes and they are not intended to substitute informed professional advice, I or mazdamenders.net cannot personally be hold responsible for any damage occurred from following this procedure or any injuries from it. Proceed at your own risk.


Mk 1 Eunos 93 black V.S II 1.8 ,
Mk 2 .1/4 Roadster 99 black & gold V.S 1.8 .
Mk 1 Eunos 90 1.6 soul red ..f/ build
MK 2.1/4 Blue V.S Roadster 1.8 99 ..
MK1 1.8 ,white import.. (Ashleighs)
MK1 1.6 yellow J ltd import.f/build
MK 1 1.8 black Tokyo Ltd..f/build


http://www.mx5oc.co.uk/ http://www.mx5nutz.com/forum/ http://miata.net/ http://www.autolinkuk.co.uk/
User avatar
GlennyGills
Moderator
Posts: 630
Joined: Tue Jul 10, 2012 8:13 pm
Location: Reading

Re: 1995 G-Limited ***RESTORATION***Rebuild

Postby GlennyGills » Sat Jan 02, 2021 9:06 pm

Excellent work
'96 Gleneagles MeisterR Coilovers - engine bling stainless mx5parts full exhaust
User avatar
Lumphammer
Moderator
Posts: 316
Joined: Thu Nov 15, 2012 10:57 pm

Re: 1995 G-Limited ***RESTORATION***Rebuild

Postby Lumphammer » Mon Jan 04, 2021 7:58 pm

Took the VVT engine oil pump to bits, my motivation for doing this was to get an indication of the internal health of the engine without doing a bottom end strip down - which I don't want to do right now.

The gears are in exceptional condition which confirms that this is a low miles engine that hasn't been messed with previously :-D

oil_pump_outer_gear.jpg
oil_pump_outer_gear.jpg (321.97 KiB) Viewed 8058 times


The outside casing was really manky, I got a bit OCD and decided to make it look nicer. Spent a while masking off all the precision surfaces with tape and rubber sheet and media blasted it

blasted_pump.jpg
blasted_pump.jpg (409.22 KiB) Viewed 8058 times


masked_pump.jpg
masked_pump.jpg (426.64 KiB) Viewed 8058 times


Cleaned, painted in VHT silver and baked in the oven at 220C

Cleaned the hell out of it until I was 110% it was utterly clean

oil_pump_casing.jpg
oil_pump_casing.jpg (439.08 KiB) Viewed 8058 times


Reassembling the parts. Replaced the split pin on the pressure bypass but otherwise the parts went in as is

oil_pump_parts.jpg
oil_pump_parts.jpg (437.5 KiB) Viewed 8058 times


All the innards back in with assembly lubricant, bar the back plate

oil_pump_gears_in.jpg
oil_pump_gears_in.jpg (431.49 KiB) Viewed 8058 times


Torqued down and ready to go back on

oil_pump_rear.jpg
oil_pump_rear.jpg (391.81 KiB) Viewed 8058 times


oil_pump_front.jpg
oil_pump_front.jpg (402.9 KiB) Viewed 8058 times
User avatar
Lumphammer
Moderator
Posts: 316
Joined: Thu Nov 15, 2012 10:57 pm

Re: 1995 G-Limited ***RESTORATION***Rebuild

Postby Lumphammer » Mon Jan 04, 2021 8:16 pm

Had to take the sump and main bearing support plate off to get the oil pump off so cleaned them up too

Got the sump totally cleaned out of all the old oil

01_clean_sump.jpg
01_clean_sump.jpg (423.7 KiB) Viewed 8055 times


Baffle, cleaned and reattached with loctite blue (243) on the threads

01_baffle.jpg
01_baffle.jpg (399.85 KiB) Viewed 8055 times


Retapped the holes in the block, there gets loads of old silicone and rust in there after years of use

01_retap.jpg
01_retap.jpg (529.25 KiB) Viewed 8055 times


I used this stuff I had leftover from doing the bathroom years ago. This stuff is amazing, just cheapo screwfix stuff but it attacks silicone and you can scrape it off with a stick or wire brush

01_silicone_remover.jpg
01_silicone_remover.jpg (470.75 KiB) Viewed 8055 times


MBSP - like most of the parts I cleaned them with petrol and wiped clean. Siliconed (loctite 5980) and back on. Replaced gasket on the oil pickup

01_mbsp_in.jpg
01_mbsp_in.jpg (476.16 KiB) Viewed 8055 times


Silicone on the sump, trying to be neat. Think i used a touch too much but should be fine

01_silicone_sump.jpg
01_silicone_sump.jpg (410.92 KiB) Viewed 8055 times


Sump back on, torqued in two stages. Screws were replated zinc / yellow a while ago.

01_sump_on.jpg
01_sump_on.jpg (442.58 KiB) Viewed 8055 times


Onto the top of the engine, all oil seals replaced

01_engine_upright.jpg
01_engine_upright.jpg (469.53 KiB) Viewed 8055 times
User avatar
Lumphammer
Moderator
Posts: 316
Joined: Thu Nov 15, 2012 10:57 pm

Re: 1995 G-Limited ***RESTORATION***Rebuild

Postby Lumphammer » Mon Jan 04, 2021 8:32 pm

Finished the fuel rail. I turned the standoffs into saddles so I could remove the rail more easily by undoing the two screws on each, I did the bend at the front in one piece because having a join looked c**p.

Pressure test on the junk head at 75PSI, used refrigeration leak detector spray. Its just ultra foamy washing up liquid in a can.

ptest_rail.jpg
ptest_rail.jpg (492.15 KiB) Viewed 8055 times


I used filler to smooth out the joins and then painted it

fuel_rail.jpg
fuel_rail.jpg (463.41 KiB) Viewed 8055 times


I think in the fullness of time I'm going to re-make it - first thing is that when brasing i must have c**ked up my setup so the regulator sits at a jaunty angle, that bugs me. Also the general cumbersome layout I dont like and the filler which I thought would smooth it all together, looks rubbish! :-D

I've been using this stuff, it's from Frosts and is actually quite good - with caveats. I think it's mostly either hydrochloric or phosphoric acid, it eats zinc so beware. It says it just needs agitation with a brush but I found a brass toothbrush is needed on very scabby parts. Anyway, it's quite good and with electical tape you can effectively mask of bits you want left alone. If anyone has tried to clean an inlet manifold with petrol / degreasers you'll know how futile it is but this stuff just eats it. These are unpainted but are ready for paint.

ali_clean.jpg
ali_clean.jpg (487.2 KiB) Viewed 8055 times


Done the VVT housing actuator in this way

vvt_act_housing.jpg
vvt_act_housing.jpg (344.87 KiB) Viewed 8055 times


And the cam cover has come out nice. Both painted in VHT silver and baked in the oven

painted_cam_cover.jpg
painted_cam_cover.jpg (479.13 KiB) Viewed 8055 times


Apart from that, painted a few bits and my plan is to get the engine into the car in the near future

assorted_bits.jpg
assorted_bits.jpg (492.33 KiB) Viewed 8055 times

Return to “Members Mx-5/ Roadsters”

Who is online

Users browsing this forum: No registered users and 7 guests