What you put in, you'll get back ten fold
***** THIS IS VERY IMPORTANT TO THE SITE AND HELPING YOU,OTHERWISE IT CLOSES AND ALL THIS ON LINE GARAGE IS GONE FOR GOOD*****

Greetings and welcome to menders, this site was built for every owner that might need her to help keep those bills low and also keep them on the road where they belong, she is run by very passionate enthusiasts owners for passionate enthusiastic owners, see her like a on line garage, there is a lot of tech stuff hopefully explained for everyone to use, if there is something you cannot get your head around, or you feel that there is a strong walk through guide missing that needs creating by one of us or from yourselves, please let us know, we are also on false book and youtube, which as short tech vids to help, and again if you feel there is a vid that would help please get it touch.
the menders is free, but like everything there is a cost to run things and bills( we are just happy its not a heating cost), so if we have saved you hundreds, please throw a small donation in the pot so we can keep on going to carry on helping others in the same way .

*** we are currently looking for a sponsor for this year, so if you have the passion and can see this sites worth to everyone , please get in touch and step forward to help***

And thank heavens that we are now on the way back up the brighter ,warmer longer days, "come on summer", and lets see those project builds.


M-m

Another NA ***RESTORATION***

A place for members to show off their pride and joy. Also room to document your projects.
Natehd9
Regular
Posts: 74
Joined: Tue Jan 07, 2020 4:09 pm

Re: Another NA restoration

Postby Natehd9 » Thu Apr 09, 2020 12:11 pm

As promised some photos of the plumbing install.

Took today off work (30th birthday present to myself!) Should hopefully finish the install today...

IMG_20200409_112337.jpg
IMG_20200409_112337.jpg (292.28 KiB) Viewed 13258 times


IMG_20200409_112330.jpg
IMG_20200409_112330.jpg (270.26 KiB) Viewed 13258 times


IMG_20200409_112321.jpg
IMG_20200409_112321.jpg (243.66 KiB) Viewed 13258 times


IMG_20200409_112308.jpg
IMG_20200409_112308.jpg (243.89 KiB) Viewed 13258 times


IMG_20200409_112313.jpg
IMG_20200409_112313.jpg (214.94 KiB) Viewed 13258 times


Excuse the mess, really should spend half a day having a thorough sort out, just keep getting excited about other things...

This is the first connection point, will be installing two more on the rear and opposite walls of the garage.

Also got a tidy stack of new tools for my birthday!

IMG_20200409_111251.jpg
IMG_20200409_111251.jpg (300.94 KiB) Viewed 13258 times
User avatar
blackyb
Moderator
Posts: 1525
Joined: Tue Sep 17, 2013 8:41 pm
Location: Scarborough

Re: Another NA restoration

Postby blackyb » Thu Apr 09, 2020 9:57 pm

Garage size envy here.

Wish I could knock mine down and rebuild it bigger but that would mean knocking the neighbours house down.

Enjoying the read.
1993 1.6 Eunos Roadster (gone)
1998 UK Mk 2 1.6 (gone)
2003 1.8 SVT Sport (shouldnt have sold it)
1991 1.6 Eunos Roadster with a bit of bling.

Life is a journey, best travelled topless in an MX5!!
Natehd9
Regular
Posts: 74
Joined: Tue Jan 07, 2020 4:09 pm

Re: Another NA restoration

Postby Natehd9 » Fri Apr 10, 2020 8:14 pm

Pleased to say I've had a very productive day! Getting whole days working on the car are few and far between as I'm still working almost every day so like to spend my weekends with my wife (an NHS worker so she's always working too!)

Finished up plumbing the air ring main, working back from the last leg gave all the joints a good nip, opened up the tap from the compressor and... No leaks! :dance:

The compressor sits in a separate room so the door can be shut meaning it's not too noisy when it's running, the ring has 3 drop legs with quick release connections, there are a couple of other drop legs for the regulator and an inline filter, all pipework has been installed with a drop to ensure moisture in the line runs to the nearest drain leg.

IMG_20200410_195245.jpg
IMG_20200410_195245.jpg (275.13 KiB) Viewed 13192 times


IMG_20200410_195301.jpg
IMG_20200410_195301.jpg (253.56 KiB) Viewed 13192 times


IMG_20200410_195317.jpg
IMG_20200410_195317.jpg (267.51 KiB) Viewed 13192 times


IMG_20200410_195326.jpg
IMG_20200410_195326.jpg (230.52 KiB) Viewed 13192 times


IMG_20200410_195338.jpg
IMG_20200410_195338.jpg (206.63 KiB) Viewed 13192 times


Took a bit of time putting thread sealant on all the quick connects to the air tools, gave each a quick run, very pleased!

My dad had an old shotblaster sat at the back of the garage, dug it out, gave it a clean up and have given it it's first run in however long it's been!

IMG_20200410_195357.jpg
IMG_20200410_195357.jpg (294.9 KiB) Viewed 13192 times


IMG_20200410_195407.jpg
IMG_20200410_195407.jpg (364.63 KiB) Viewed 13192 times


To give an idea of how it started, here's the front subframe which will be getting the same treatment tomorrow!

IMG_20200410_195415.jpg
IMG_20200410_195415.jpg (269.16 KiB) Viewed 13192 times


The blaster ran out of blast media and it was getting dark so decided to call it a day, definitely don't want to be doing this inside!

Not sure how I'm going to blast the underside of the car, either tent out the garage with polythene sheet, or wheel the rig outside.... I'm sure I'll come up with something
User avatar
Lumphammer
Moderator
Posts: 316
Joined: Thu Nov 15, 2012 10:57 pm

Re: Another NA restoration

Postby Lumphammer » Sat Apr 11, 2020 9:19 am

Happy birthday for a few days ago Nate, hope you took time out for a few beers :obscene-drinkingcheers:

Very nice air setup, that's a lovely garage too - see how the axe has pride of place!!

How much blasting media do you go through using it outside like that? Subframe will come up a treat with some POR15
Natehd9
Regular
Posts: 74
Joined: Tue Jan 07, 2020 4:09 pm

Re: Another NA restoration

Postby Natehd9 » Fri Apr 17, 2020 3:54 pm

Sorry, should have updated this a few days ago!

Finished shot blasting the subframes, the front came up way nicer than the rear!

Took about 3 bags of grit in the end, quite wasteful, but without the correct PPE I would definitely not be doing it indoors so can't be helped unfortunately!

IMG-20200411-WA0006.jpeg
IMG-20200411-WA0006.jpeg (559.48 KiB) Viewed 13172 times


IMG_20200411_155805.jpg
IMG_20200411_155805.jpg (240.65 KiB) Viewed 12852 times


IMG_20200411_155812.jpg
IMG_20200411_155812.jpg (277.27 KiB) Viewed 12852 times


They've come up great, so I'm really pleased with that.

Started reinstalling wishbones, but where I've pressed the inner collars has distorted some of the bushes so will have to spend some time 'convincing' them back in, or strip the bushes again and redo it with my more effective press set up!

Didn't get any photos, but spent a couple of hours last night getting started on the drivers side sill, starting with the front panel of the rear arch (confusing!)

I was wondering if anyone would be able to tell me where I could find a section for the bottom of the rear arches on both sides, seems a waste to buy a whole arch panel when I only need the bottom section from the bottom of the door and below...
User avatar
Mazda Mender
Site Admin
Posts: 15090
Joined: Tue Dec 06, 2011 6:18 pm
Location: Pie land, in the glen of Wiganshire
Contact:

Re: Another NA restoration

Postby Mazda Mender » Fri Apr 17, 2020 4:17 pm

Contact Autolinkmx5 useing menders discount code.
M-m
The Disclaimer:-
This post is a natural product made from recycled electrons. The slight variations in spelling and grammar enhance its individual character and beauty and in no way are to be considered flaws or defects, the articles/answers/comments are provided for information purposes and they are not intended to substitute informed professional advice, I or mazdamenders.net cannot personally be hold responsible for any damage occurred from following this procedure or any injuries from it. Proceed at your own risk.


Mk 1 Eunos 93 black V.S II 1.8 ,
Mk 2 .1/4 Roadster 99 black & gold V.S 1.8 .
Mk 1 Eunos 90 1.6 soul red ..f/ build
MK 2.1/4 Blue V.S Roadster 1.8 99 ..
MK1 1.8 ,white import.. (Ashleighs)
MK1 1.6 yellow J ltd import.f/build
MK 1 1.8 black Tokyo Ltd..f/build


http://www.mx5oc.co.uk/ http://www.mx5nutz.com/forum/ http://miata.net/ http://www.autolinkuk.co.uk/
User avatar
Lumphammer
Moderator
Posts: 316
Joined: Thu Nov 15, 2012 10:57 pm

Re: Another NA restoration

Postby Lumphammer » Tue Apr 21, 2020 11:23 am

They're looking superb Nate. I share your pain of not being able to buy decent masks at the moment, never seen a single disposable mask used so many times!!
Natehd9
Regular
Posts: 74
Joined: Tue Jan 07, 2020 4:09 pm

Re: Another NA restoration

Postby Natehd9 » Tue Apr 21, 2020 8:47 pm

Thanks for the kind words Tom, they're definitely better than they were!

I think unfortunately I'm going to have to remove and repress the bushes, the arms really don't want to go back into the subframes as they are at the moment!

Hopefully I'll get back over to the car tomorrow evening, going to crack on with the bodywork for the time being I think...

On a side note I've started another of my side-projects... I've loved chaser indicators (like you see on new Audis and Fords) ever since first seeing them so after doing a lot of research I've decided that I'm just going to make my own, SIDE-PROJECT!

Bought an Arduino clone from Amazon and I'm slowly teaching myself coding, then going to build new indicators along with some other custom stuff (emergency brake lights, etc)

IMG_20200421_204018.jpg
IMG_20200421_204018.jpg (339.05 KiB) Viewed 12980 times
IMG_20200421_204025.jpg
IMG_20200421_204025.jpg (353.42 KiB) Viewed 12980 times


Not much of an update, but you know!

Will get some photos of the bodywork tomorrow, more fighting with the arches!
John&Luke
Serial Poster
Posts: 395
Joined: Sat Jul 13, 2013 8:25 am

Re: Another NA restoration

Postby John&Luke » Thu Apr 23, 2020 2:28 pm

Good work on the subframes. Re your wishbone bushes, are you reusing the old bushes or replacing? Poly bushes or rubber?

When it comes to your bodywork the best investment is a pair of scissors and some light weight card. Having learnt the hardway it’s always better to make card templates/ pattens before committing to metal.

Making a card pattern before committing to cut anything gives you the benefit of a practice before the real thing.

Would be very interested in seeing the progress of your clone indicator project
1996 Mk1 Classic Red 1.6 sorted
1995 Mk 1 White 1.6 in need of TLC
2015 Mk1 1.8 Exocet Mk1 on steroids
Natehd9
Regular
Posts: 74
Joined: Tue Jan 07, 2020 4:09 pm

Re: Another NA restoration

Postby Natehd9 » Mon May 04, 2020 7:00 am

Finally managed to get on with some bodywork yesterday!

The aim of the day was to start digging into the crusty bits, starting with the driver's side rear wheel well, which looked something like this (I'd already spent about two hours on spot welds and with the air saw at this point, don't seem to have any photos of it 'as found')
IMG_20200503_130759.jpg
IMG_20200503_130759.jpg (719.09 KiB) Viewed 12853 times


After several more hours trying to find all the spot welds I was presented with this:
IMG_20200503_135814.jpg
IMG_20200503_135814.jpg (702.47 KiB) Viewed 12853 times

IMG_20200503_135816.jpg
IMG_20200503_135816.jpg (698.15 KiB) Viewed 12853 times


Unfortunately more crust was hiding behind the panel, more cutting and drilling required!
IMG-20200503-WA0007.jpeg
IMG-20200503-WA0007.jpeg (402.88 KiB) Viewed 12853 times


The upshoot of this was as the first area I would have to be forming my own panel, these are at least out of sight! More cutting, drilling and welding gave this:
IMG_20200503_171112.jpg
IMG_20200503_171112.jpg (639.6 KiB) Viewed 12853 times


Now for this blighter
IMG_20200503_175207.jpg
IMG_20200503_175207.jpg (679.42 KiB) Viewed 12853 times


All patched up:
IMG_20200503_191052_650.jpg
IMG_20200503_191052_650.jpg (485.79 KiB) Viewed 12853 times


Still needs a little bit of dressing up, but I'll get to that once the sill is off and the full picture is available...

So I rolled the car so it's back level and removed the doors
IMG_20200503_185852.jpg
IMG_20200503_185852.jpg (742.29 KiB) Viewed 12853 times


That little lot took the whole day (from 1 until about 7, anyway...)

So the next step is working along the driver's side sill removing all the spot welds and cutting out the panel to line up with the new pattern part, having looked through the hole made in the arch I can see there is a bit of crust in the inner arch, but we'll cross that bridge when we come to it!
User avatar
Mazda Mender
Site Admin
Posts: 15090
Joined: Tue Dec 06, 2011 6:18 pm
Location: Pie land, in the glen of Wiganshire
Contact:

Re: Another NA restoration

Postby Mazda Mender » Mon May 04, 2020 7:32 am

And the pics are the correct way too...... :bow-yellow: :happy-jumpeveryone: :happy-partydance: :happy-partydance: :happy-partydance: :happy-partydance: :happy-partydance: :happy-cheerleaderkid: :happy-cheerleaderkid: :happy-cheerleaderkid: :happy-cheerleaderkid: :happy-cheerleaderkid: :happy-wavemulticolor:

:handgestures-thumbup: :coffee: :-D :wink:
M-m
The Disclaimer:-
This post is a natural product made from recycled electrons. The slight variations in spelling and grammar enhance its individual character and beauty and in no way are to be considered flaws or defects, the articles/answers/comments are provided for information purposes and they are not intended to substitute informed professional advice, I or mazdamenders.net cannot personally be hold responsible for any damage occurred from following this procedure or any injuries from it. Proceed at your own risk.


Mk 1 Eunos 93 black V.S II 1.8 ,
Mk 2 .1/4 Roadster 99 black & gold V.S 1.8 .
Mk 1 Eunos 90 1.6 soul red ..f/ build
MK 2.1/4 Blue V.S Roadster 1.8 99 ..
MK1 1.8 ,white import.. (Ashleighs)
MK1 1.6 yellow J ltd import.f/build
MK 1 1.8 black Tokyo Ltd..f/build


http://www.mx5oc.co.uk/ http://www.mx5nutz.com/forum/ http://miata.net/ http://www.autolinkuk.co.uk/
Natehd9
Regular
Posts: 74
Joined: Tue Jan 07, 2020 4:09 pm

Re: Another NA restoration

Postby Natehd9 » Mon May 04, 2020 8:04 am

Mazda Mender wrote:And the pics are the correct way too...... :bow-yellow: :happy-jumpeveryone: :happy-partydance: :happy-partydance: :happy-partydance: :happy-partydance: :happy-partydance: :happy-cheerleaderkid: :happy-cheerleaderkid: :happy-cheerleaderkid: :happy-cheerleaderkid: :happy-cheerleaderkid: :happy-wavemulticolor:

:handgestures-thumbup: :coffee: :-D :wink:
M-m


Yeah, new phone seems to have resolved the issue :handgestures-thumbup:
User avatar
Lumphammer
Moderator
Posts: 316
Joined: Thu Nov 15, 2012 10:57 pm

Re: Another NA restoration

Postby Lumphammer » Tue May 05, 2020 9:25 am

Very nice Nate, how much rot does it have on the inner sil?
Natehd9
Regular
Posts: 74
Joined: Tue Jan 07, 2020 4:09 pm

Re: Another NA restoration

Postby Natehd9 » Tue May 05, 2020 11:35 am

Lumphammer wrote:Very nice Nate, how much rot does it have on the inner sil?


there's a reasonable amount about 8 inches forward of the arch so I suspect there will be some more grinder and fabbing time before the new panels can be put together, rather new metal than Kurust if I can avoid it!

There is someone I've found relatively local to me that makes up the lower sill sections so you don't need to chop up a whole replacement arch panel, but they're closed due to the pandemic, I'm on their wait-list so if they open before I reach that stage i'll use their panels, they look better than what I could make! :lol:
Natehd9
Regular
Posts: 74
Joined: Tue Jan 07, 2020 4:09 pm

Re: Another NA ***RESTORATION***

Postby Natehd9 » Sun May 10, 2020 11:11 am

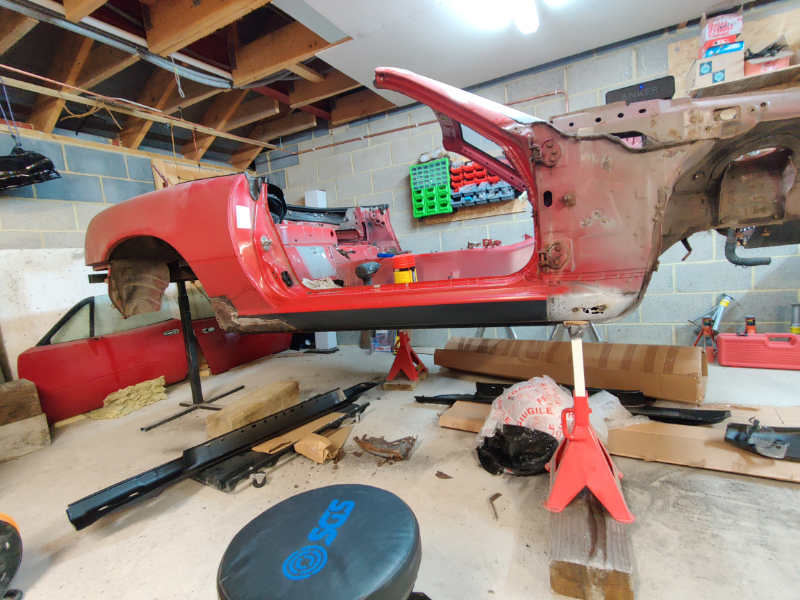
Had a pretty decent day of it yesterday, started off with this:

IMG_20200509_125304.jpg
IMG_20200509_125304.jpg (844.82 KiB) Viewed 12704 times

IMG_20200509_134325.jpg
IMG_20200509_134325.jpg (667.09 KiB) Viewed 12704 times


Crusty and unpleasant at the front and rear, after a clean up the historic 'repair' on the rear section just got more ugly!

So, time to get to work with the autopunch, drill bit and spot weld bit

Took a good bit of time to do all the ones that join the top and bottom of the panel to the monocoque, but the panel didn't budge, so off I went with the angle grinder and wire wheel bit in search of the rest of the spot welds.

The approach only got me so far as some of the spots had a pretty seamless appearance (surprising from the Mazda factory!) So I ended up chopping the sill off on sections, starting at the front:

IMG_20200509_144024.jpg
IMG_20200509_144024.jpg (705.56 KiB) Viewed 12704 times


Then a chunk off the back:

IMG_20200509_145843.jpg
IMG_20200509_145843.jpg (678.48 KiB) Viewed 12704 times


This is why you don't chop back a bit and plate over, just hides the problem!

IMG_20200509_145848.jpg
IMG_20200509_145848.jpg (717.13 KiB) Viewed 12704 times


Just a ticking timebomb waiting to undo any hard work put in!

Bit more time on the back got to this:

IMG_20200509_171812.jpg
IMG_20200509_171812.jpg (734.3 KiB) Viewed 12704 times


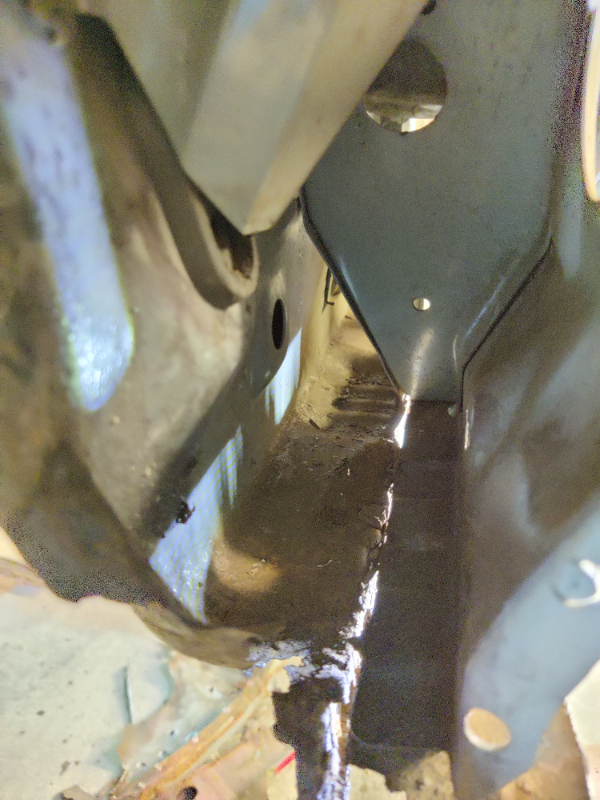
So that'll need replacing...

Looks like I'll need to replace 6-8 inches of the inner sill section as it's a bit crusty too...

IMG_20200509_172928.jpg
IMG_20200509_172928.jpg (705.79 KiB) Viewed 12704 times


After some more drilling of the various hidden spot welds we got to this:

IMG_20200509_175230.jpg
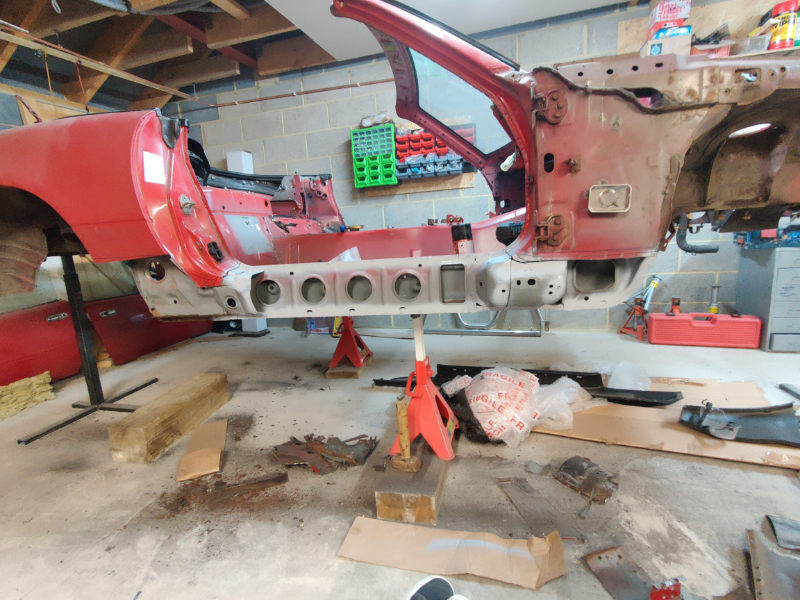
IMG_20200509_175230.jpg (854.26 KiB) Viewed 12704 times


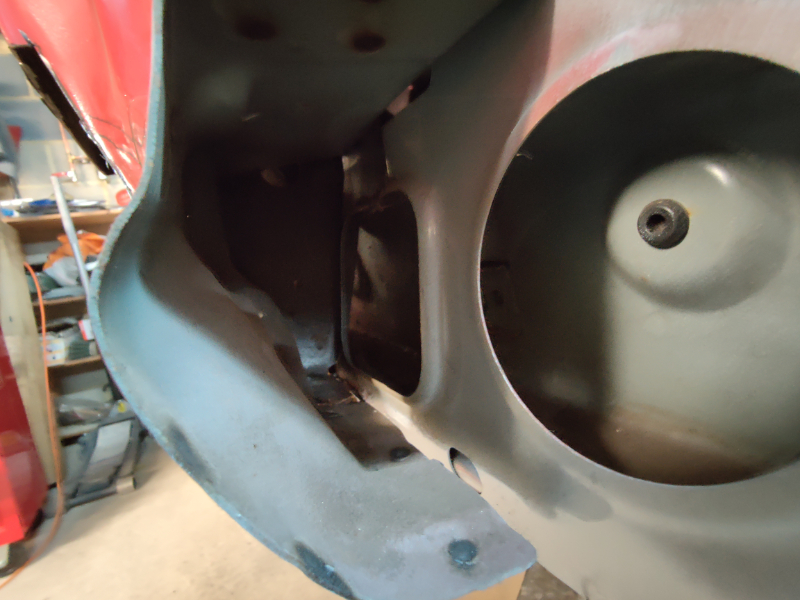
Having looked through all of the holes the inner looks really good other than right at the back so that's reassuring, going to pump a load of degreaser in there and make sure they're fully clean so that the cavity wax can do its job when we get to that stage

IMG_20200509_171836.jpg
IMG_20200509_171836.jpg (503.43 KiB) Viewed 12704 times

IMG_20200509_175247.jpg
IMG_20200509_175247.jpg (614.76 KiB) Viewed 12704 times


To finish the day I spent a half hour or so cleaning up the spot welds with a flap disk and then etch priming to protect everything id exposed

IMG_20200509_190436_163.jpg
IMG_20200509_190436_163.jpg (654.51 KiB) Viewed 12704 times


I've ordered new rear wings to replace the lower section that meets the sills so will hopefully make a start on putting it back together in the next week or so, fingers crossed!

Really satisfying work, just takes a long time to get it right!

Return to “Members Mx-5/ Roadsters”

Who is online

Users browsing this forum: No registered users and 22 guests