What you put in, you'll get back ten fold
***** THIS IS VERY IMPORTANT TO THE SITE AND HELPING YOU,OTHERWISE IT CLOSES AND ALL THIS ON LINE GARAGE IS GONE FOR GOOD*****

Greetings and welcome to menders, this site was built for every owner that might need her to help keep those bills low and also keep them on the road where they belong, she is run by very passionate enthusiasts owners for passionate enthusiastic owners, see her like a on line garage, there is a lot of tech stuff hopefully explained for everyone to use, if there is something you cannot get your head around, or you feel that there is a strong walk through guide missing that needs creating by one of us or from yourselves, please let us know, we are also on false book and youtube, which as short tech vids to help, and again if you feel there is a vid that would help please get it touch.
the menders is free, but like everything there is a cost to run things and bills( we are just happy its not a heating cost), so if we have saved you hundreds, please throw a small donation in the pot so we can keep on going to carry on helping others in the same way .

*** we are currently looking for a sponsor for this year, so if you have the passion and can see this sites worth to everyone , please get in touch and step forward to help***

And thank heavens that we are now on the way back up the brighter ,warmer longer days, "come on summer", and lets see those project builds.


M-m

Another NA ***RESTORATION***

A place for members to show off their pride and joy. Also room to document your projects.
Natehd9
Regular
Posts: 74
Joined: Tue Jan 07, 2020 4:09 pm

Re: Another NA ***RESTORATION***

Postby Natehd9 » Thu Aug 06, 2020 2:16 pm

Lumphammer wrote:That's looking very tidy. What are you planning to use for undersealing?


Cheers Tom, going with tigerseal for the seams then a coat of POR15 (still got 5 of the little tins so should be plenty to cover the underside!) Before dinitrol, bought a full underseal kit from Rejel in Schultz cannisters so will be my first experience setting up for a spray gun, looking forward to doing something that feels like putting it back together rather than pulling it apart!
Natehd9
Regular
Posts: 74
Joined: Tue Jan 07, 2020 4:09 pm

Re: Another NA ***RESTORATION***

Postby Natehd9 » Sat Aug 08, 2020 6:53 pm

Few more hours today, probably not the best day to be welding and grinding, but nevermind!

Started the day by keying the front arches for primer taking them from this:
IMG_20200808_112045.jpg
IMG_20200808_112045.jpg (692.47 KiB) Viewed 9217 times


To this:
IMG_20200808_113224.jpg
IMG_20200808_113224.jpg (626.95 KiB) Viewed 9217 times


Then spent a couple of hours having a good clean up before moving on to one of the final suspect patches on the shell, in the driver's footwell where the main floorpan meets the front firewall section, a patch about 5 square cm had rusted through, so out came the grinder! Replacement piece made up and welded in:

IMG_20200808_175020.jpg
IMG_20200808_175020.jpg (649.32 KiB) Viewed 9217 times

IMG_20200808_175035.jpg
IMG_20200808_175035.jpg (432.89 KiB) Viewed 9217 times


Wasn't sure what to do next and I've been thinking about getting the shell fully clean before moving on to anything else so the next step was smoothing out the boot

IMG_20200808_175049.jpg
IMG_20200808_175049.jpg (827.78 KiB) Viewed 9217 times

IMG_20200808_175104.jpg
IMG_20200808_175104.jpg (781.94 KiB) Viewed 9217 times


Got another session of wire wheel and chisel to get the rest cleaned up then I've got to decide what to do about under the battery, thinking of chopping out all the crusty stuff and going with a flat plate, can't think why not so unless anyone can make a suggestion?

The plan is ultimately to seam seal the boot and interior with tigerseal and then use raptor bedliner to give a nice hard-wearing finish, seen it a couple of times on Facebook and the like and it looks pretty decent, although it'll mostly be hidden by carpet!
Natehd9
Regular
Posts: 74
Joined: Tue Jan 07, 2020 4:09 pm

Re: Another NA ***RESTORATION***

Postby Natehd9 » Sun Aug 09, 2020 5:30 pm

Unbelievably I managed to get a second day in on the car this weekend, what a result!

Decided to bite the bullet with the battery compartment, lots of time spent chopping small bits out at a time which ultimately left it looking like this:

IMG_20200809_122308.jpg
IMG_20200809_122308.jpg (687.13 KiB) Viewed 9196 times


It's an awkward shape in there so a bit of firkling was required, but ultimately it ended up looking fairly decent:

IMG_20200809_130132.jpg
IMG_20200809_130132.jpg (633.97 KiB) Viewed 9196 times

IMG_20200809_162252.jpg
IMG_20200809_162252.jpg (721.95 KiB) Viewed 9196 times


Spent a bit more time removing the sound deadening from the boot well which ends up looking something like this:

IMG_20200809_163237.jpg
IMG_20200809_163237.jpg (783.62 KiB) Viewed 9196 times


I've got a couple of bottles of Raptor bedliner paint on order, need to strip the rest of the seam sealer from the interior and boot before that can be done though, hopefully get a good chunk done one evening this week!
John&Luke
Serial Poster
Posts: 395
Joined: Sat Jul 13, 2013 8:25 am

Re: Another NA ***RESTORATION***

Postby John&Luke » Mon Aug 10, 2020 10:36 pm

Natehd9 wrote:I've got a couple of bottles of Raptor bedliner paint on order, need to strip the rest of the seam sealer from the interior and boot before that can be done though, hopefully get a good chunk done one evening this week!


Firstly, great work IMO.

Re using Raptor, are you going for colour tinted? I would advise letting any mastic go rock hard before applying the raptor. The raptor paint will set rock hard and if the mastic is soft under it the raptor may crack.

Mask up any holes so you limit overspray. In fact mask everything you don’t want raptor on. It can be a bit messy, and is a bugger to get off. Clean you applicator gun straight afterward, well otherwise kiss good bye to it it the raptor sets.

Keep the updates coming.

J
1996 Mk1 Classic Red 1.6 sorted
1995 Mk 1 White 1.6 in need of TLC
2015 Mk1 1.8 Exocet Mk1 on steroids
Natehd9
Regular
Posts: 74
Joined: Tue Jan 07, 2020 4:09 pm

Re: Another NA ***RESTORATION***

Postby Natehd9 » Tue Aug 11, 2020 8:28 am

Thanks John, some good advice there!

Staying black I think, still not sure what colour I'm painting the car and black goes with everything!
Natehd9
Regular
Posts: 74
Joined: Tue Jan 07, 2020 4:09 pm

Re: Another NA ***RESTORATION***

Postby Natehd9 » Thu Aug 13, 2020 10:46 am

Not much of an update, got a couple of hours in last night to do the last pass over the boot and the voids that pass under the rear shelf before primer, this will be the last time the roll bar comes out so worth doing it well!

I'd put a coat of rust converter on any questionable patches so was presented with this:

IMG_20200812_201717.jpg
IMG_20200812_201717.jpg (784.04 KiB) Viewed 9122 times


A couple more passes with so 80 grit to give a nice key before primer:

IMG_20200812_203035.jpg
IMG_20200812_203035.jpg (557.22 KiB) Viewed 9122 times


Next stop - masking and tigerseal, hopefully all the silicone work I've done around the house will come in handy!
Natehd9
Regular
Posts: 74
Joined: Tue Jan 07, 2020 4:09 pm

Re: Another NA ***RESTORATION***

Postby Natehd9 » Fri Aug 14, 2020 11:25 am

A bit more time yesterday evening (lucky me!), the plan was to strip any final bits from the interior and then remove all the remaining dodgy seam sealer in preparation for the raptor respray.

I worked my way round the remainder of the driver's side and it was pretty uneventful, I'd already dealt with a crusty bit in the driver's footwell (as can be seen in an earlier post) so that was fine.

I was expecting the passengers side to be more of the same, there was some staining in the passengers footwell that looked like water had been sat near the ECU for a while (seems a common issue, anyone care to explain?), but having gone over it with a wire wheel it didn't uncover any nasties, result!

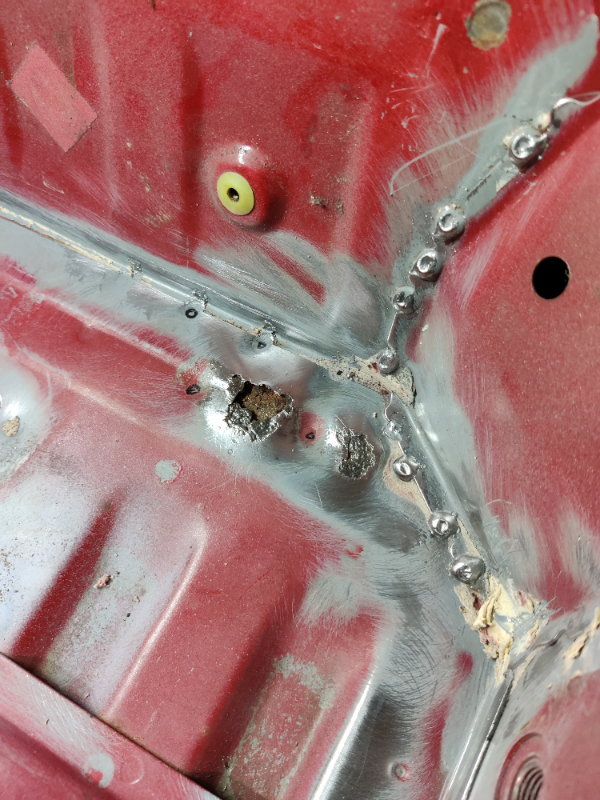
My luck ran out as I worked my way to the rear bulkhead of the passengers side, right in the last corner (sod's law!) I found this:

IMG_20200813_195942.jpg
IMG_20200813_195942.jpg (775.31 KiB) Viewed 9097 times


Nothing for it but to cut the crust out and weld in some new metal. It's a tricky bit of the body as you have three skins all meeting at this point, of course it's always the multi-skinned parts that rust! :roll:

IMG_20200813_201440.jpg
IMG_20200813_201440.jpg (722.08 KiB) Viewed 9097 times


IMG_20200813_204737.jpg
IMG_20200813_204737.jpg (532.72 KiB) Viewed 9097 times


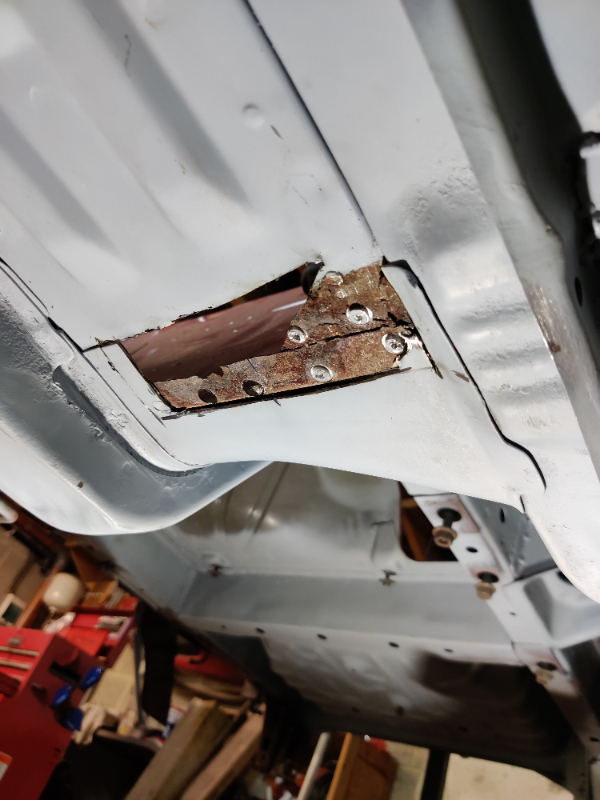
By this point it was pretty late so I made a measurement for a replacement piece and marked up some steel. This will have to wait as I'm off next week for a campervan holiday to the Peak District!

Hopefully that'll be the last of the rust... Pretty sure I've said that before!
User avatar
Ron_Tomo
New
Posts: 10
Joined: Tue Aug 10, 2021 5:41 pm
Location: Chorley

Re: Another NA ***RESTORATION***

Postby Ron_Tomo » Mon Aug 16, 2021 11:48 pm

Really useful this to me. Just about to tackle the boot. looks tip top
Mk 1 Eunos 89 Silver

Return to “Members Mx-5/ Roadsters”

Who is online

Users browsing this forum: No registered users and 8 guests