 />
/> />
/>  />
/> 

I'll talk you through it.
M-m
What you put in, you'll get back ten fold
***** THIS IS VERY IMPORTANT TO THE SITE AND HELPING YOU,OTHERWISE IT CLOSES AND ALL THIS ON LINE GARAGE IS GONE FOR GOOD*****
Greetings and welcome to menders, this site was built for every owner that might need her to help keep those bills low and also keep them on the road where they belong, she is run by very passionate enthusiasts owners for passionate enthusiastic owners, see her like a on line garage, there is a lot of tech stuff hopefully explained for everyone to use, if there is something you cannot get your head around, or you feel that there is a strong walk through guide missing that needs creating by one of us or from yourselves, please let us know, we are also on false book and youtube, which as short tech vids to help, and again if you feel there is a vid that would help please get it touch.
the menders is free, but like everything there is a cost to run things and bills( we are just happy its not a heating cost), so if we have saved you hundreds, please throw a small donation in the pot so we can keep on going to carry on helping others in the same way .
*** we are currently looking for a sponsor for this year, so if you have the passion and can see this sites worth to everyone , please get in touch and step forward to help***
And thank heavens that we are now on the way back up the brighter ,warmer longer days, "come on summer", and lets see those project builds.
M-m
Swopping a Mk2 front suspension onto my Mk1
-
Mazda Mender

- Site Admin
- Posts: 15097
- Joined: Tue Dec 06, 2011 6:18 pm
- Location: Pie land, in the glen of Wiganshire
- Contact:
Re: Swopping a Mk2 front suspension onto my Mk1
The Disclaimer:-
This post is a natural product made from recycled electrons. The slight variations in spelling and grammar enhance its individual character and beauty and in no way are to be considered flaws or defects, the articles/answers/comments are provided for information purposes and they are not intended to substitute informed professional advice, I or mazdamenders.net cannot personally be hold responsible for any damage occurred from following this procedure or any injuries from it. Proceed at your own risk.
Mk 1 Eunos 93 black V.S II 1.8 ,
Mk 2 .1/4 Roadster 99 black & gold V.S 1.8 .
Mk 1 Eunos 90 1.6 soul red ..f/ build
MK 2.1/4 Blue V.S Roadster 1.8 99 ..
MK1 1.8 ,white import.. (Ashleighs)
MK1 1.6 yellow J ltd import.f/build
MK 1 1.8 black Tokyo Ltd..f/build
http://www.mx5oc.co.uk/ http://www.mx5nutz.com/forum/ http://miata.net/ http://www.autolinkuk.co.uk/
-
Bluebell18

- Just Run In
- Posts: 40
- Joined: Thu Jan 30, 2020 3:22 pm
- Location: Cheshire
Re: Swopping a Mk2 front suspension onto my Mk1
Sorry M-m only just seen your post, been a bit busy fitting new spring, steering rack boot and finishing off the painting jobs before assembly starts.
I would appreciate your thoughts if you think I might have missed anything.
Dave
I would appreciate your thoughts if you think I might have missed anything.
Dave
Eunos Roadster …. One of the 'Blue Gs'
-
Bluebell18
- Just Run In
- Posts: 40
- Joined: Thu Jan 30, 2020 3:22 pm
- Location: Cheshire
Re: Swopping a Mk2 front suspension onto my Mk1
Friday 09th, Day 5
All parts of the spring assembly repainted and when dry reassembled with little difficulty.
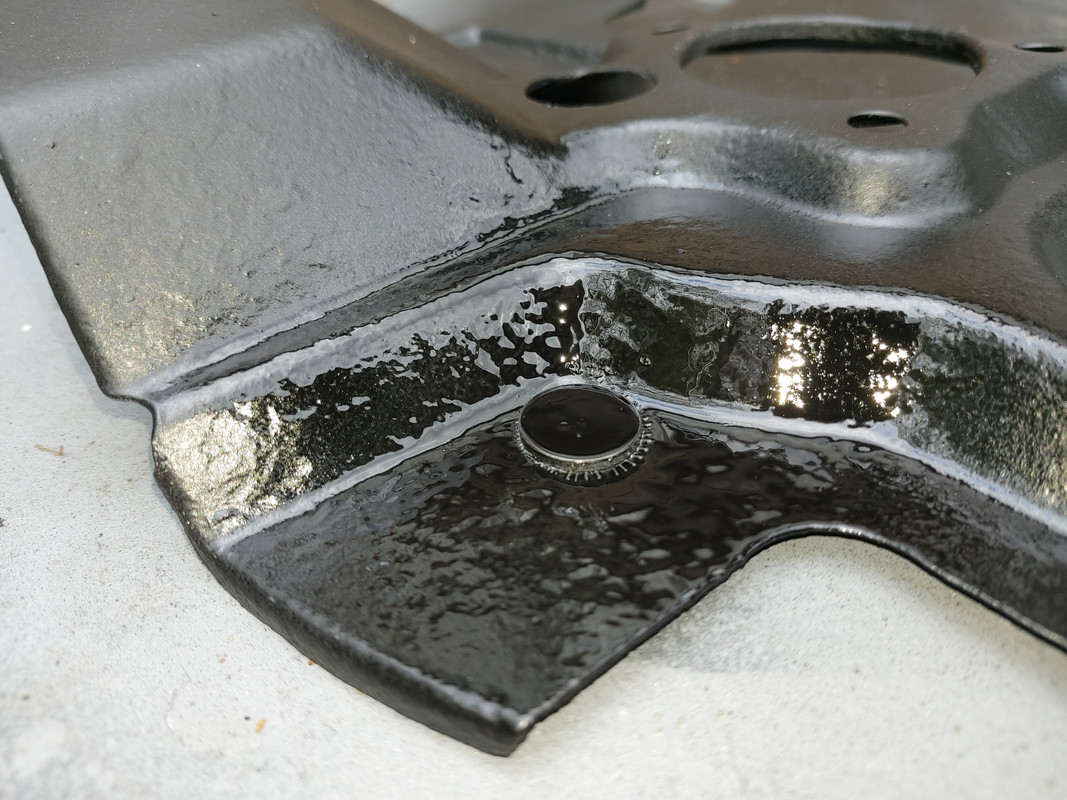
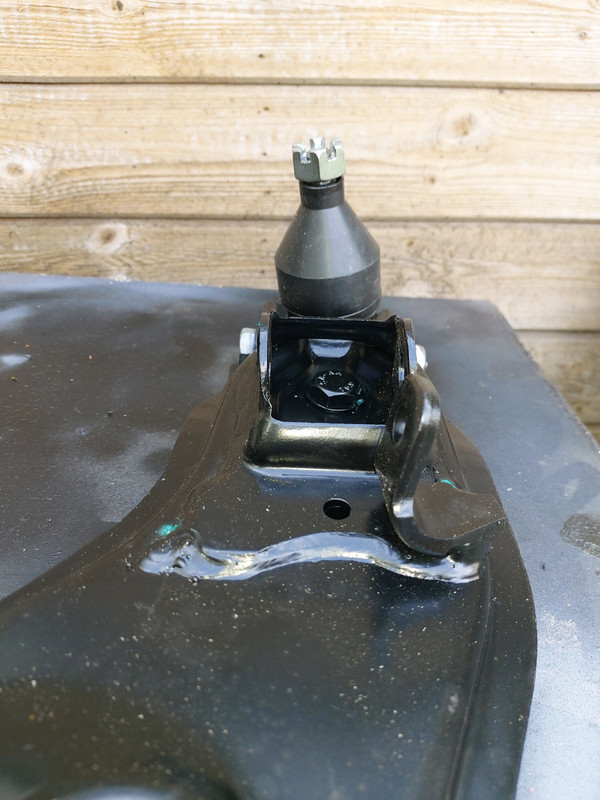
Support bracket of the under bonnet brace bar removed for repainting and discovered that whilst the paint in general was ok the underneath and more importantly the inner wing area around the hole was rusty. Rust wire brushed off, all treated with rust remover gel, primed and top coat applied. The bracket is silver and for the body I use Halfords Navy Blue which is an almost perfect match for the original Satellite Blue but without the mica speckles.
Decided that the afternoon would be a good opportunity to replace the steering rack boot and paint the new track rod end, easy 30 min job. When I discovered that the near side boot had a small split I researched replacement starting with OEM. Now £41.52 per side is a tad expensive to my way of thinking for a couple of bits of rubber/plastic so I looked for something more reasonably priced. The problem was that the alternatives listed at a more reasonable £24 came with review warning that they were a hard plastic and difficult to fit. A look on the Bay of E sourced some from First Line, the suppliers of my suspension parts for £15 so I ordered thinking that if all was not well I would have to bite the bullet and replace then with OEM.
The job started well enough and as the old boot slid down it discharged a gooey mess all over my hands, not sure what this is, thinking a mixture of power steering fluid and water, however there appears to be no loss of fluid in the reservoir. Will need to keep an eye on this in the future, perhaps next year it will be time to do the front of engine, cam belt etc and I can look at the steering rack then.
Opened the box of new boots to find two car specific items not the universal type that many were selling, but they were a fairly hard type of plastic. Tried one on for size and yes it was going to be a very tight fit. Boiling water would not soften it sufficiently and finally hit on the idea of forcing it over a large screw driver handle using a heat gun to warm it up. It worked and with a little grease and a lot of pushing it was on, the small end was a perfect fit and the clip held it firmly in place.
Track rod end attached and the simple 30 min job was complete some 2 hrs later.

Dave
All parts of the spring assembly repainted and when dry reassembled with little difficulty.
Support bracket of the under bonnet brace bar removed for repainting and discovered that whilst the paint in general was ok the underneath and more importantly the inner wing area around the hole was rusty. Rust wire brushed off, all treated with rust remover gel, primed and top coat applied. The bracket is silver and for the body I use Halfords Navy Blue which is an almost perfect match for the original Satellite Blue but without the mica speckles.
Decided that the afternoon would be a good opportunity to replace the steering rack boot and paint the new track rod end, easy 30 min job. When I discovered that the near side boot had a small split I researched replacement starting with OEM. Now £41.52 per side is a tad expensive to my way of thinking for a couple of bits of rubber/plastic so I looked for something more reasonably priced. The problem was that the alternatives listed at a more reasonable £24 came with review warning that they were a hard plastic and difficult to fit. A look on the Bay of E sourced some from First Line, the suppliers of my suspension parts for £15 so I ordered thinking that if all was not well I would have to bite the bullet and replace then with OEM.
The job started well enough and as the old boot slid down it discharged a gooey mess all over my hands, not sure what this is, thinking a mixture of power steering fluid and water, however there appears to be no loss of fluid in the reservoir. Will need to keep an eye on this in the future, perhaps next year it will be time to do the front of engine, cam belt etc and I can look at the steering rack then.
Opened the box of new boots to find two car specific items not the universal type that many were selling, but they were a fairly hard type of plastic. Tried one on for size and yes it was going to be a very tight fit. Boiling water would not soften it sufficiently and finally hit on the idea of forcing it over a large screw driver handle using a heat gun to warm it up. It worked and with a little grease and a lot of pushing it was on, the small end was a perfect fit and the clip held it firmly in place.
Track rod end attached and the simple 30 min job was complete some 2 hrs later.
Dave
Eunos Roadster …. One of the 'Blue Gs'
-
Bluebell18
- Just Run In
- Posts: 40
- Joined: Thu Jan 30, 2020 3:22 pm
- Location: Cheshire
Re: Swopping a Mk2 front suspension onto my Mk1
Saturday 10th, Day 6
Brace bar bracket reinstated on inner wing with a layer of grease in an attempt to prevent further corrosion. Spring/shock absorber unit bolted in place, twice after remembering to place the washer on top of the unit.
Top wishbone offered up and copper slip used to lubricate the long bolt in case it is ever needed to be removed, however whilst this car is a keeper I doubt that this will happen in my ownership. Reused the existing bolt as it was in good condition but used a new flanged nut.
Lower wishbone was slightly more problematic as I suspect that one bush was pressed in slightly too far, however with a little persuasion it was slotted home.
Two new adjustment bolts and everything done up finger tight. The old bolts were rusted solid and to be honest I had never fully understood how these bolts allowed the suspension to be adjusted until I installed these. Having painted the upright with several coats of paint I now had to scrape this out of the two tapered holes to allow the ball joint tapers to seat correctly. For some reason the lower castellated nut was not tall enough to allow the slots to engage with split pin, a large thick stainless steel washer cured this slight problem. Again the 70mm lower shock bolt was reused with a new flanged nut and the two ball joint nuts were torqued up, the top and bottom wish bone bolts will be done once the restored suspension has had chance to settle.

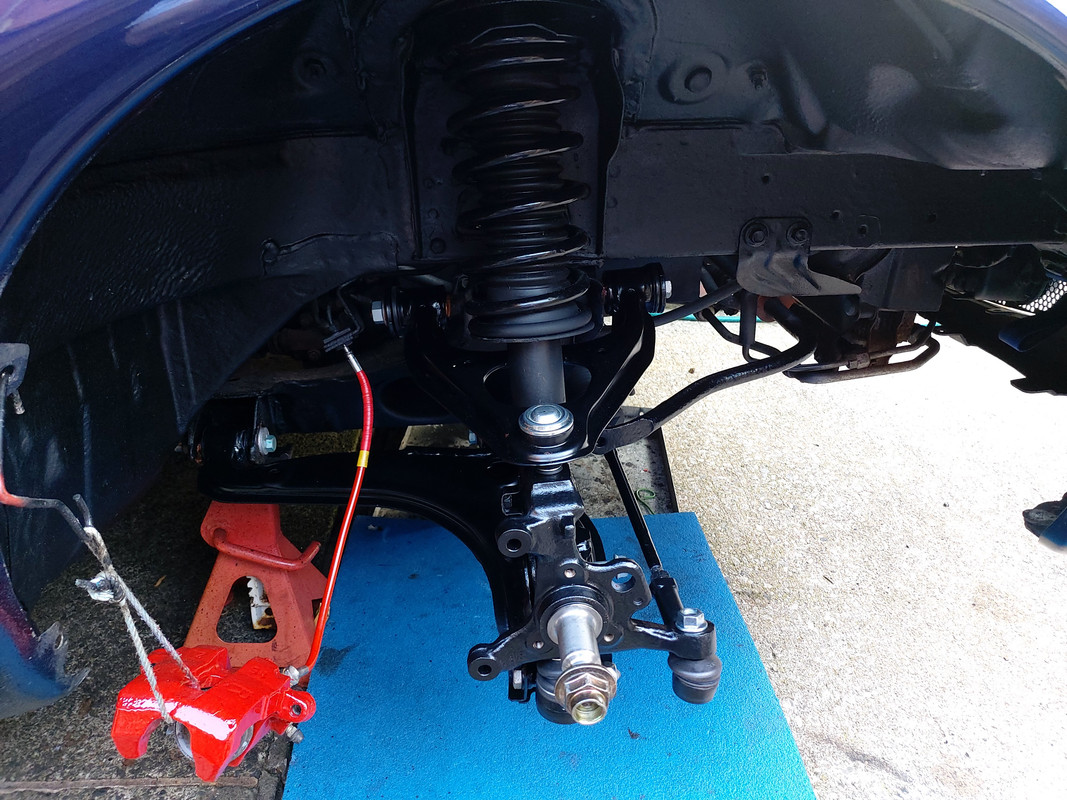
The brake back plate holes are something of a mystery, the smaller one is irregular and obviously corrosion whereas the larger is circular and lines up the now defunct ABS sensor hole. This would imply that these are not original and must be replacements as the car does not have this system.The smaller hole was made circular and a plug was made to fill it and riveted in place.
To allow the backplate to be removed at a later date a brass plug was pressed into the large hole on the upright.

The back plate was then fitted with new bolts which were torqued up.

One more day hopefully and it will be back on all four wheels
Dave
Brace bar bracket reinstated on inner wing with a layer of grease in an attempt to prevent further corrosion. Spring/shock absorber unit bolted in place, twice after remembering to place the washer on top of the unit.
Top wishbone offered up and copper slip used to lubricate the long bolt in case it is ever needed to be removed, however whilst this car is a keeper I doubt that this will happen in my ownership. Reused the existing bolt as it was in good condition but used a new flanged nut.
Lower wishbone was slightly more problematic as I suspect that one bush was pressed in slightly too far, however with a little persuasion it was slotted home.
Two new adjustment bolts and everything done up finger tight. The old bolts were rusted solid and to be honest I had never fully understood how these bolts allowed the suspension to be adjusted until I installed these. Having painted the upright with several coats of paint I now had to scrape this out of the two tapered holes to allow the ball joint tapers to seat correctly. For some reason the lower castellated nut was not tall enough to allow the slots to engage with split pin, a large thick stainless steel washer cured this slight problem. Again the 70mm lower shock bolt was reused with a new flanged nut and the two ball joint nuts were torqued up, the top and bottom wish bone bolts will be done once the restored suspension has had chance to settle.
The brake back plate holes are something of a mystery, the smaller one is irregular and obviously corrosion whereas the larger is circular and lines up the now defunct ABS sensor hole. This would imply that these are not original and must be replacements as the car does not have this system.The smaller hole was made circular and a plug was made to fill it and riveted in place.
To allow the backplate to be removed at a later date a brass plug was pressed into the large hole on the upright.
The back plate was then fitted with new bolts which were torqued up.
One more day hopefully and it will be back on all four wheels
Dave
Eunos Roadster …. One of the 'Blue Gs'
-
Mazda Mender
- Site Admin
- Posts: 15097
- Joined: Tue Dec 06, 2011 6:18 pm
- Location: Pie land, in the glen of Wiganshire
- Contact:
Re: Swopping a Mk2 front suspension onto my Mk1
Don't forget that she will need a full alignment doing before you think about taking her for a proper drive..
Great work buddy.
M-m
Great work buddy.
M-m
The Disclaimer:-
This post is a natural product made from recycled electrons. The slight variations in spelling and grammar enhance its individual character and beauty and in no way are to be considered flaws or defects, the articles/answers/comments are provided for information purposes and they are not intended to substitute informed professional advice, I or mazdamenders.net cannot personally be hold responsible for any damage occurred from following this procedure or any injuries from it. Proceed at your own risk.
Mk 1 Eunos 93 black V.S II 1.8 ,
Mk 2 .1/4 Roadster 99 black & gold V.S 1.8 .
Mk 1 Eunos 90 1.6 soul red ..f/ build
MK 2.1/4 Blue V.S Roadster 1.8 99 ..
MK1 1.8 ,white import.. (Ashleighs)
MK1 1.6 yellow J ltd import.f/build
MK 1 1.8 black Tokyo Ltd..f/build
http://www.mx5oc.co.uk/ http://www.mx5nutz.com/forum/ http://miata.net/ http://www.autolinkuk.co.uk/
This post is a natural product made from recycled electrons. The slight variations in spelling and grammar enhance its individual character and beauty and in no way are to be considered flaws or defects, the articles/answers/comments are provided for information purposes and they are not intended to substitute informed professional advice, I or mazdamenders.net cannot personally be hold responsible for any damage occurred from following this procedure or any injuries from it. Proceed at your own risk.
Mk 1 Eunos 93 black V.S II 1.8 ,
Mk 2 .1/4 Roadster 99 black & gold V.S 1.8 .
Mk 1 Eunos 90 1.6 soul red ..f/ build
MK 2.1/4 Blue V.S Roadster 1.8 99 ..
MK1 1.8 ,white import.. (Ashleighs)
MK1 1.6 yellow J ltd import.f/build
MK 1 1.8 black Tokyo Ltd..f/build
http://www.mx5oc.co.uk/ http://www.mx5nutz.com/forum/ http://miata.net/ http://www.autolinkuk.co.uk/
-
Bluebell18
- Just Run In
- Posts: 40
- Joined: Thu Jan 30, 2020 3:22 pm
- Location: Cheshire
Re: Swopping a Mk2 front suspension onto my Mk1
Thanks M-m, yes I appreciate the need for a full alignment and whilst not in a rush due to present restrictions have you any recommendations for the S. Manchester area?
I have ordered a cheap £12 magnetic camber gauge and having read the WSM pages on setting up I thought I would aim to try and get the bolts central in the slots in the first instance, tighten up and take it somewhere for a professional job. Local tyre places offer 'Hunter' 4 wheel set up but I would prefer to take it to somewhere that understands these cars.
I have yet to start the passenger side and I suspect that the rear camber bolts are also seized solid, so thinking that as this self confinement is going to last some time I might remove rear bolts and check the lower wishbone moves then replace with new. That way all four wheels can be adjusted correctly.
Dave
Eunos Roadster …. One of the 'Blue Gs'
-
Bluebell18
- Just Run In
- Posts: 40
- Joined: Thu Jan 30, 2020 3:22 pm
- Location: Cheshire
Re: Swopping a Mk2 front suspension onto my Mk1
Sunday 11th, Day 7
The spindle was greased as per M-m instructions and the new hub fitted. Originally I intended to reuse the old hubs but decided that whilst it was all apart I may as well go new. These are not OEM for cost reasons but look to be well made, only time will tell and to be on the safe side I will put the old parts into storage.

Hub on and the nut torqued up to 100 ft-lbs which is the limit of my wrench I had to borrow my son’s which will do 150, I then unpacked my new front disks.
These were purchased as a complete set of EBC Ultra Quiet Sports disks with Brembo pads some time ago when I replaced the rear calipers.
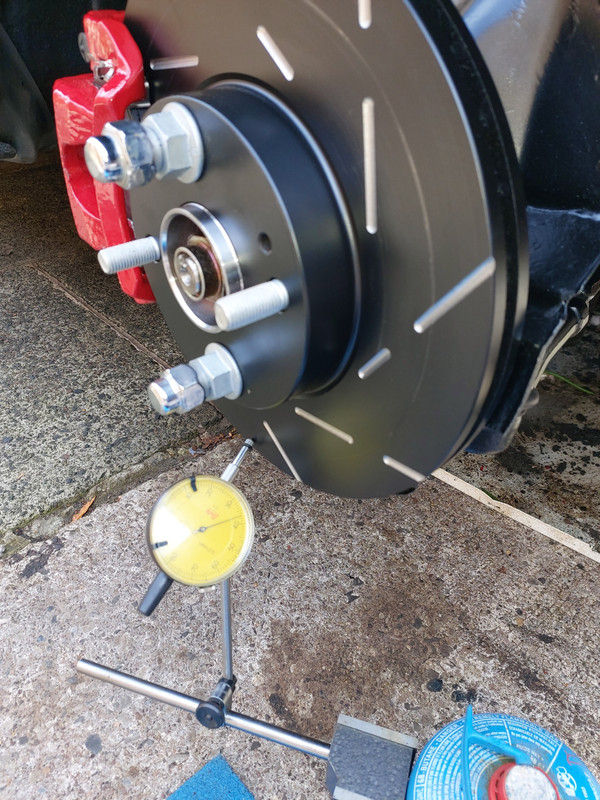
I need to bolt them on properly and test the runout with a DTI but that is a job for tomorrow.
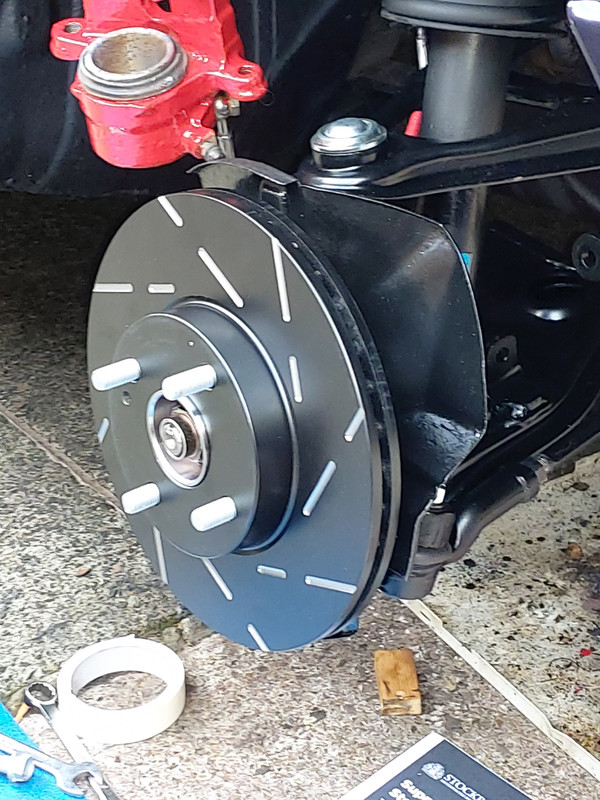
Newly painted caliper carrier was fitted along with the stainless inserts followed by the pads and springs.
The Brembo pads came with new fittings which appeared to be the same as the ones I had taken off, ceramic grease on the pad ends and red grease on the new slide pins and the caliper was reinstated.
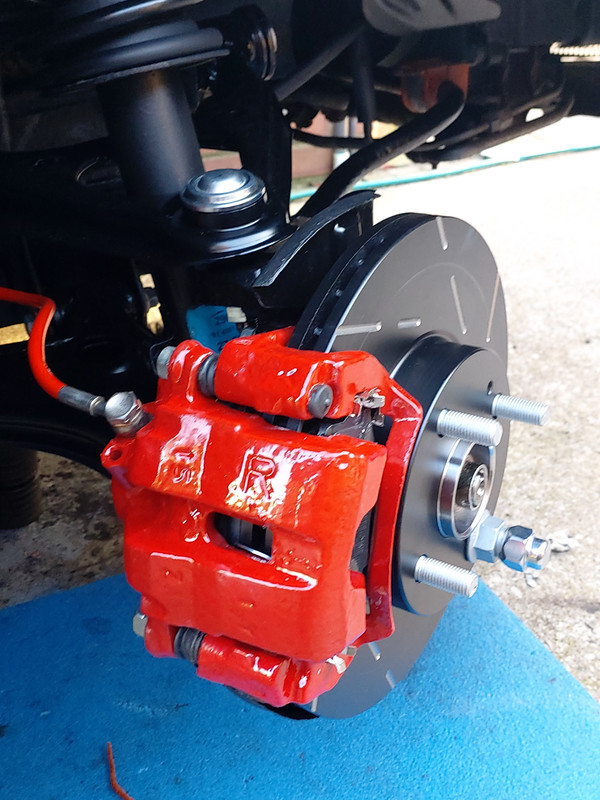
All looks good so far I like the black disks, it is a shame that the coating doesn’t last but looking at the rear set which have been on over 18 mths it is holding up well on the un swept areas of the disk.
As usual it would appear that my just one more day was a little premature, almost there.
Dave
The spindle was greased as per M-m instructions and the new hub fitted. Originally I intended to reuse the old hubs but decided that whilst it was all apart I may as well go new. These are not OEM for cost reasons but look to be well made, only time will tell and to be on the safe side I will put the old parts into storage.
Hub on and the nut torqued up to 100 ft-lbs which is the limit of my wrench I had to borrow my son’s which will do 150, I then unpacked my new front disks.
These were purchased as a complete set of EBC Ultra Quiet Sports disks with Brembo pads some time ago when I replaced the rear calipers.
I need to bolt them on properly and test the runout with a DTI but that is a job for tomorrow.
Newly painted caliper carrier was fitted along with the stainless inserts followed by the pads and springs.
The Brembo pads came with new fittings which appeared to be the same as the ones I had taken off, ceramic grease on the pad ends and red grease on the new slide pins and the caliper was reinstated.
All looks good so far I like the black disks, it is a shame that the coating doesn’t last but looking at the rear set which have been on over 18 mths it is holding up well on the un swept areas of the disk.
As usual it would appear that my just one more day was a little premature, almost there.
Dave
Eunos Roadster …. One of the 'Blue Gs'
-
Bluebell18
- Just Run In
- Posts: 40
- Joined: Thu Jan 30, 2020 3:22 pm
- Location: Cheshire
Re: Swopping a Mk2 front suspension onto my Mk1
Tuesday 13th, Day 8
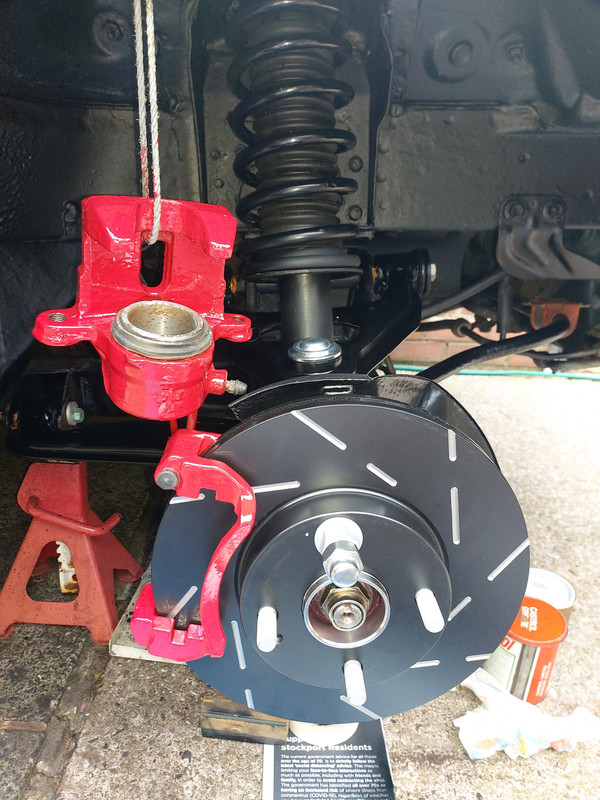
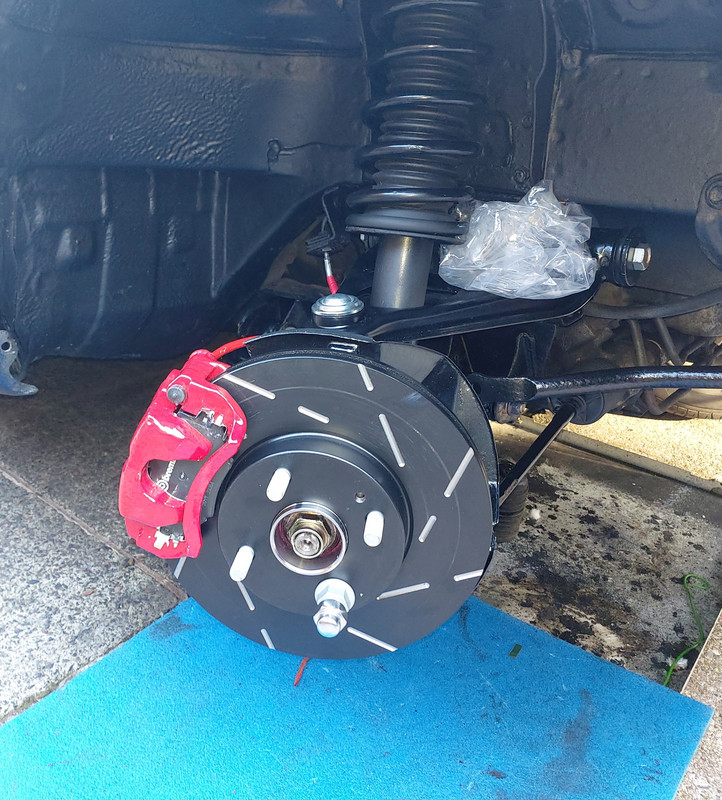
Wheel arch liner refitted followed by front mud flap.
DTI set up and run out checked, all good hub nut torqued to 150 ft-lbs, staked and cap fitted.
Final check of all nut torques excluding the wishbone ends and ball joint nut split pins fitted. A bit of a mystery here as the bottom arm was supplied with a castle nut the top arm was just a flanged nut so for the moment the pin is above the nut, not sure if I need to source a proper nut and replace before serious use.

Finally, the circle closes and I return to the Mk1 drop link question, will it fit?
Top bush bolted to the ARB and low and behold the bottom one lined up with the single thicker bracket on the lower arm and the bolt just slid home.
I was expecting a bit of a struggle and was pleasantly surprised. Took M-m's advice and fitted large s/steel washers to prevent the bushes pulling free, although whilst the bottom bush was originally held on both sides the top one was just bolted to the ARB with no washer.
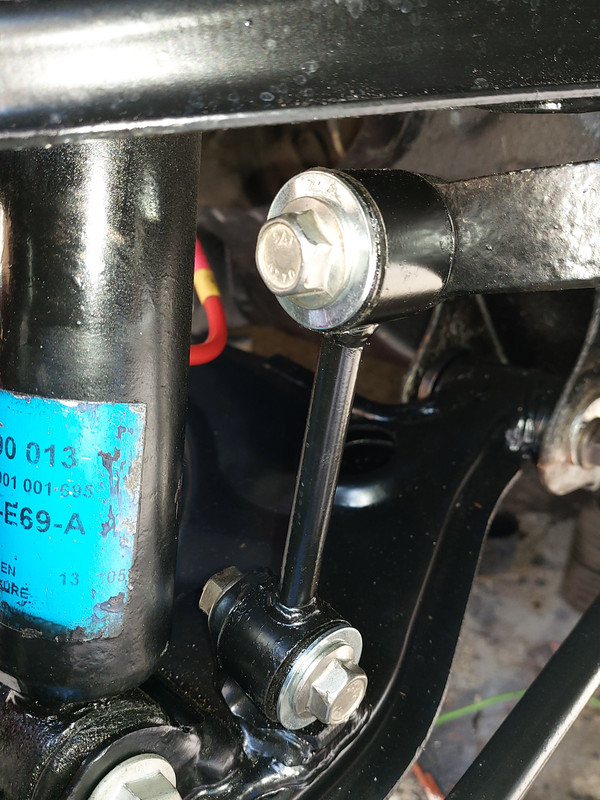
The ease with which this fitted together made me wonder as the drop link slopes towards the front of the car, so I checked the other arm and the bracket is indeed welded on at an angle.
Just need to put the wheel on now and lower it to the floor, then I will let it settle for several days before torqueing up the remaining nuts. I need to look at repairing the rear edge of the under tray next, however I think I have been lined up for a number of domestic jobs but eventually I will move the car and start on the passenger side.
Dave
Wheel arch liner refitted followed by front mud flap.
DTI set up and run out checked, all good hub nut torqued to 150 ft-lbs, staked and cap fitted.
Final check of all nut torques excluding the wishbone ends and ball joint nut split pins fitted. A bit of a mystery here as the bottom arm was supplied with a castle nut the top arm was just a flanged nut so for the moment the pin is above the nut, not sure if I need to source a proper nut and replace before serious use.
Finally, the circle closes and I return to the Mk1 drop link question, will it fit?
Top bush bolted to the ARB and low and behold the bottom one lined up with the single thicker bracket on the lower arm and the bolt just slid home.
I was expecting a bit of a struggle and was pleasantly surprised. Took M-m's advice and fitted large s/steel washers to prevent the bushes pulling free, although whilst the bottom bush was originally held on both sides the top one was just bolted to the ARB with no washer.
The ease with which this fitted together made me wonder as the drop link slopes towards the front of the car, so I checked the other arm and the bracket is indeed welded on at an angle.
Just need to put the wheel on now and lower it to the floor, then I will let it settle for several days before torqueing up the remaining nuts. I need to look at repairing the rear edge of the under tray next, however I think I have been lined up for a number of domestic jobs but eventually I will move the car and start on the passenger side.
Dave
Eunos Roadster …. One of the 'Blue Gs'
Return to “Members Mx-5/ Roadsters”
Who is online
Users browsing this forum: No registered users and 7 guests
