What you put in, you'll get back ten fold
***** THIS IS VERY IMPORTANT TO THE SITE AND HELPING YOU,OTHERWISE IT CLOSES AND ALL THIS ON LINE GARAGE IS GONE FOR GOOD*****

Greetings and welcome to menders, this site was built for every owner that might need her to help keep those bills low and also keep them on the road where they belong, she is run by very passionate enthusiasts owners for passionate enthusiastic owners, see her like a on line garage, there is a lot of tech stuff hopefully explained for everyone to use, if there is something you cannot get your head around, or you feel that there is a strong walk through guide missing that needs creating by one of us or from yourselves, please let us know, we are also on false book and youtube, which as short tech vids to help, and again if you feel there is a vid that would help please get it touch.
the menders is free, but like everything there is a cost to run things and bills( we are just happy its not a heating cost), so if we have saved you hundreds, please throw a small donation in the pot so we can keep on going to carry on helping others in the same way .

*** we are currently looking for a sponsor for this year, so if you have the passion and can see this sites worth to everyone , please get in touch and step forward to help***

And thank heavens that we are now on the way back up the brighter ,warmer longer days, "come on summer", and lets see those project builds.


M-m

2002 Arizona Rebuild

A place for members to show off their pride and joy. Also room to document your projects.
User avatar
Lumphammer
Moderator
Posts: 316
Joined: Thu Nov 15, 2012 10:57 pm

Re: 2002 Arizona Rebuild

Postby Lumphammer » Sun Feb 19, 2023 7:12 pm

Not had much time but got the engine out. Pretty misterable experience, everything was siezed or required the force of Zeus to undo. The exhaust manifold and cat was particularly bad, had to undo the cat from the mid section, the bell housing bolts that hold the cat bracket and the manifold to head bolts so the cat and manifold could be drawn up in the engine bay to get to the three bolts that hold the manifold to the cat. Everything is rust :lol:

Some pictures - stripped stuff off the engine

01_ancillaries.jpg
01_ancillaries.jpg (521.7 KiB) Viewed 3425 times


Then after a lot of misery underneath the car lifted the engine out

02_engine_lift.jpg
02_engine_lift.jpg (563.37 KiB) Viewed 3425 times


Put the engine on the stand. It's a cheap eBay stand, I made some custom bolts to account for the fine threads on the block when i did the Mk1 but i think that G19 engineering sell a set that does the same now

03_engine_stand.jpg
03_engine_stand.jpg (548.59 KiB) Viewed 3425 times


Engine bay without the engine. After the picture i had a go at the subframe with a chisel and it went through in a couple of places so will be getting a second hand better condition one. All the subframes and suspension will be getting blasted, zinc metal sprayed and epoxy so there's no point starting with a bad one

04_engine_bay.jpg
04_engine_bay.jpg (538.95 KiB) Viewed 3425 times


This is a set of OEM mazda panels for the front chassis rails. You can still buy them remarkably. I think they were in the region of ÂŁ300 all together which isn't bad for OEM panels in my opinion, if anyone want's the Mazda parts numbers I'll dig them out. Shows the two layers for the crumple zone.

05_panels.jpg
05_panels.jpg (433.51 KiB) Viewed 3425 times


I'm hoping to get a front leg section off a breaker to practise how i want to do the repair, I'm going to do it as close to original as possible. I'm not really sure this is the best way to do it, it's certainly not the easiest, but i just want to.. and it's my car so.. :mrgreen:
User avatar
Mazda Mender
Site Admin
Posts: 15097
Joined: Tue Dec 06, 2011 6:18 pm
Location: Pie land, in the glen of Wiganshire
Contact:

Re: 2002 Arizona Rebuild

Postby Mazda Mender » Sun Feb 19, 2023 7:58 pm

I hope that you are also attacking the subframe etc ,power steering pipes ect ,while it's a case of it all out /off and while I have gone this far I may as well bud...
M-m
The Disclaimer:-
This post is a natural product made from recycled electrons. The slight variations in spelling and grammar enhance its individual character and beauty and in no way are to be considered flaws or defects, the articles/answers/comments are provided for information purposes and they are not intended to substitute informed professional advice, I or mazdamenders.net cannot personally be hold responsible for any damage occurred from following this procedure or any injuries from it. Proceed at your own risk.


Mk 1 Eunos 93 black V.S II 1.8 ,
Mk 2 .1/4 Roadster 99 black & gold V.S 1.8 .
Mk 1 Eunos 90 1.6 soul red ..f/ build
MK 2.1/4 Blue V.S Roadster 1.8 99 ..
MK1 1.8 ,white import.. (Ashleighs)
MK1 1.6 yellow J ltd import.f/build
MK 1 1.8 black Tokyo Ltd..f/build


http://www.mx5oc.co.uk/ http://www.mx5nutz.com/forum/ http://miata.net/ http://www.autolinkuk.co.uk/
User avatar
Lumphammer
Moderator
Posts: 316
Joined: Thu Nov 15, 2012 10:57 pm

Re: 2002 Arizona Rebuild

Postby Lumphammer » Sun Feb 19, 2023 8:51 pm

The subframe is too far gone, it's got holes, but I'll be getting a good second hand one. All the subframes and suspension will be getting blasted and then zinc metal sprayed, then epoxy. The cars going on the rotisserie once the front chassis rails are done, don't worry everything is going to be done. I'll replace the ps lines, they've got pitting rust on them so imo they're past saving
User avatar
Mazda Mender
Site Admin
Posts: 15097
Joined: Tue Dec 06, 2011 6:18 pm
Location: Pie land, in the glen of Wiganshire
Contact:

Re: 2002 Arizona Rebuild

Postby Mazda Mender » Sun Feb 19, 2023 9:26 pm

Lumphammer wrote:The subframe is too far gone, it's got holes, but I'll be getting a good second hand one. All the subframes and suspension will be getting blasted and then zinc metal sprayed, then epoxy. The cars going on the rotisserie once the front chassis rails are done, don't worry everything is going to be done. I'll replace the ps lines, they've got pitting rust on them so imo they're past saving

:bow-yellow: :bow-yellow: :handgestures-thumbup: :coffee:
M-m
The Disclaimer:-
This post is a natural product made from recycled electrons. The slight variations in spelling and grammar enhance its individual character and beauty and in no way are to be considered flaws or defects, the articles/answers/comments are provided for information purposes and they are not intended to substitute informed professional advice, I or mazdamenders.net cannot personally be hold responsible for any damage occurred from following this procedure or any injuries from it. Proceed at your own risk.


Mk 1 Eunos 93 black V.S II 1.8 ,
Mk 2 .1/4 Roadster 99 black & gold V.S 1.8 .
Mk 1 Eunos 90 1.6 soul red ..f/ build
MK 2.1/4 Blue V.S Roadster 1.8 99 ..
MK1 1.8 ,white import.. (Ashleighs)
MK1 1.6 yellow J ltd import.f/build
MK 1 1.8 black Tokyo Ltd..f/build


http://www.mx5oc.co.uk/ http://www.mx5nutz.com/forum/ http://miata.net/ http://www.autolinkuk.co.uk/
User avatar
Lumphammer
Moderator
Posts: 316
Joined: Thu Nov 15, 2012 10:57 pm

Re: 2002 Arizona Rebuild

Postby Lumphammer » Sat Mar 04, 2023 7:30 pm

Had a few couple hour stints. This is the state of one of the chassis rail sections before I started doing anything. On the outside it's not that bad compared to a lot although the top part is quite bad on this nearside

01_rust.jpg
01_rust.jpg (512.36 KiB) Viewed 3307 times


Took out the subframe and all suspension to get more space. Lots of rusty nuts, subframe is junk with pitting and holes etc.

02_subframe_gone.jpg
02_subframe_gone.jpg (538.4 KiB) Viewed 3307 times


To get access I removed the headlight frame and the top rail at the front where the latch mounts to

03_much_removed.jpg
03_much_removed.jpg (535.48 KiB) Viewed 3307 times


After drilling out rusty spot welds and taking a rusted part of the front arm part the replacement top piece sitting where it needs to go eventually. Did the cut on the flat sections so it'll be easier to make the replacement and dress etc

04_top_panel.jpg
04_top_panel.jpg (539.14 KiB) Viewed 3307 times


This is why i'm doing it in a complicated way, the spalling rust goes all the way under the front subframe mount assembly inside the chassis rail, beneath the shock tower.

05_inner_rust.jpg
05_inner_rust.jpg (523.96 KiB) Viewed 3307 times


I don't like the way others do front chassis rail repair, they cut it just before this point and weld in a thick single layer piece, the thing i loath is that they're leaving a load of spalling rust filled metal inside the subframe mount assembly structure. I think this is sketchy AF so i'm not doing that.

After today's rusty adventure I think i'm going to remove the 4mm plate beneath the assembly, the one the subframe bolts to and the shock reinforcement piece inside the wheel arch. This should let me remove about 4/5th of the original outer skin and all the inner skin of the chassis rail. With them removed i should be able to clean up any rust left over inside the assembly, treat and begin reassembling. I'm going to have to jig the front of the car (off of.. something..?) because it's all going to get a bit floppy
User avatar
Mazda Mender
Site Admin
Posts: 15097
Joined: Tue Dec 06, 2011 6:18 pm
Location: Pie land, in the glen of Wiganshire
Contact:

Re: 2002 Arizona Rebuild

Postby Mazda Mender » Sat Mar 04, 2023 9:09 pm

:text-coolphotos: :text-goodpost: :handgestures-thumbup: :coffee:
M-m
The Disclaimer:-
This post is a natural product made from recycled electrons. The slight variations in spelling and grammar enhance its individual character and beauty and in no way are to be considered flaws or defects, the articles/answers/comments are provided for information purposes and they are not intended to substitute informed professional advice, I or mazdamenders.net cannot personally be hold responsible for any damage occurred from following this procedure or any injuries from it. Proceed at your own risk.


Mk 1 Eunos 93 black V.S II 1.8 ,
Mk 2 .1/4 Roadster 99 black & gold V.S 1.8 .
Mk 1 Eunos 90 1.6 soul red ..f/ build
MK 2.1/4 Blue V.S Roadster 1.8 99 ..
MK1 1.8 ,white import.. (Ashleighs)
MK1 1.6 yellow J ltd import.f/build
MK 1 1.8 black Tokyo Ltd..f/build


http://www.mx5oc.co.uk/ http://www.mx5nutz.com/forum/ http://miata.net/ http://www.autolinkuk.co.uk/
User avatar
Lumphammer
Moderator
Posts: 316
Joined: Thu Nov 15, 2012 10:57 pm

Re: 2002 Arizona Rebuild

Postby Lumphammer » Sun Mar 05, 2023 7:22 pm

Today didn't go as hoped, the way the front chassis rail is fabricated is awkward and hard to disassemble.

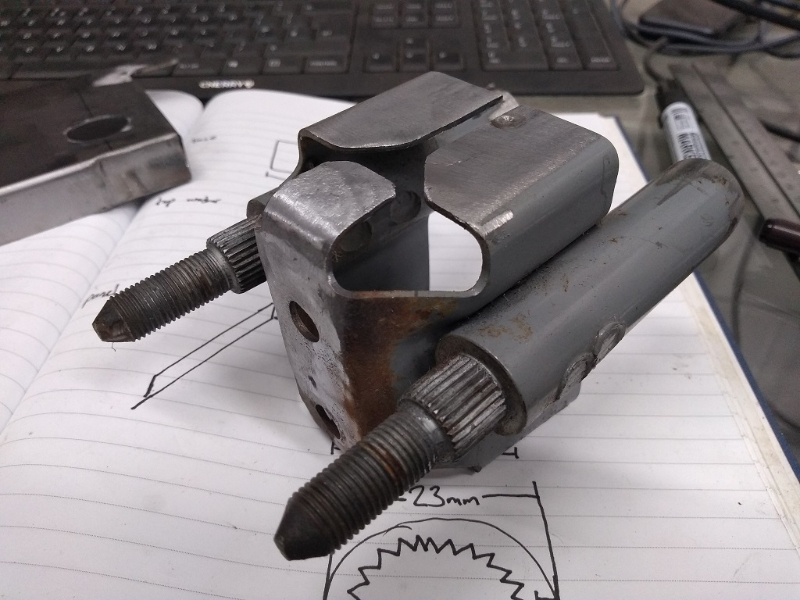
The front subframe mount in the chassis rail is two studs spot welded to a thick inner tube which is then welded to the 4mm mounting plate on the underside and a formed steel plate on the inside, the plate joins the sides of the tube to the chassis rail which is down to single thickness at that point

01_thing.jpg
01_thing.jpg (470.52 KiB) Viewed 3289 times


Showing strut tower side bracing which runs all the way down to the base of the chassis rail

02_thing2.jpg
02_thing2.jpg (466.09 KiB) Viewed 3289 times


The 4mm base plate had to be chopped up to get it off because it's welded to the base of the tube holding the studs

03_thing3.jpg
03_thing3.jpg (546.34 KiB) Viewed 3289 times


Several spot welds later the stuf mounting assembly was removed

04_removed.jpg
04_removed.jpg (467.52 KiB) Viewed 3289 times


Stud mounting assembly. It's still got a bit of the 4mm mounting plate left on it and needs a good cleanup. Going to have more of a look at it becasue i can't work out how mazda do the original layup. I *think* the bottom of the tubes must be welded to the 4mm base plate first and then to top lot inserted from above.. not sure..

05_stud_block.jpg
05_stud_block.jpg (419.68 KiB) Viewed 3289 times


Rot goes further back. After the subframe mounts it has about 4" where it goes back to double skin. I didn't know that but it probably hasn't helped this.. which is pretty bad

06_rot.jpg
06_rot.jpg (505.36 KiB) Viewed 3289 times


At this point i think i'm committed to rebuilding most of it back to the bulkhead. bugger.
User avatar
blackyb
Moderator
Posts: 1528
Joined: Tue Sep 17, 2013 8:41 pm
Location: Scarborough

Re: 2002 Arizona Rebuild

Postby blackyb » Mon Mar 06, 2023 9:49 am

A challenge for 2023. Take your time and dont rush. You'll get there.
1993 1.6 Eunos Roadster (gone)
1998 UK Mk 2 1.6 (gone)
2003 1.8 SVT Sport (shouldnt have sold it)
1991 1.6 Eunos Roadster with a bit of bling.

Life is a journey, best travelled topless in an MX5!!
User avatar
Lumphammer
Moderator
Posts: 316
Joined: Thu Nov 15, 2012 10:57 pm

Re: 2002 Arizona Rebuild

Postby Lumphammer » Sun Mar 12, 2023 7:15 pm

Thanks blacky, hopefully get there eventually :-)

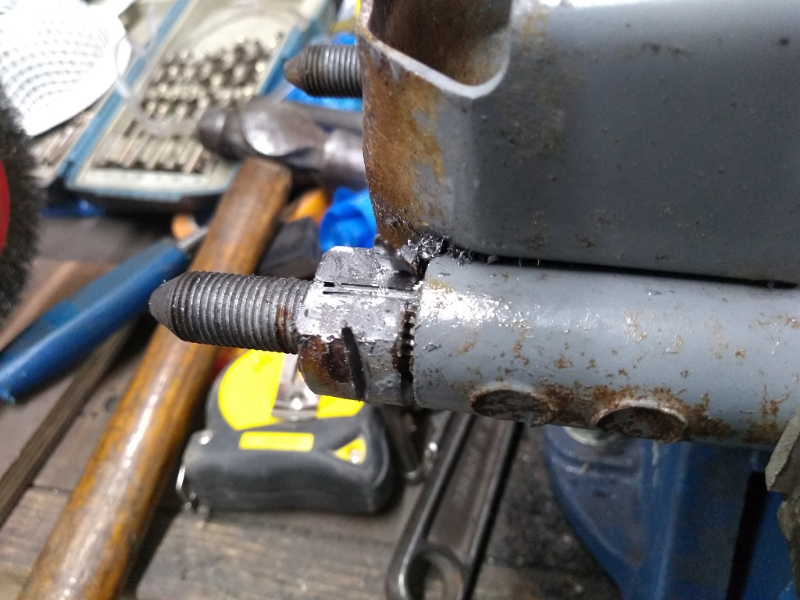
Through looking at it a bit I worked out how the subframe mount was made in the factory. The lower part - the 5mm base plate the subframe bolts to, is one part with the two 23mm cups welded to it. This is welded to the outer leg and later on the studs are pressed in as another unit from above. From witness marks underneath I guessed the studs have a "spline" rolled into them to provide a very strong interference fit into the base plate. The only way to get an interference fit thing like that apart is to relieve it so I tried that.

Mounted the stud unit in the mill and carefully cut down until a split appeared - can see it splitting in the picture

01_mill.jpg
01_mill.jpg (429.14 KiB) Viewed 3198 times


Then clamped it in the vice and cut a slot to get purchase with the chisel, a couple of hits and it starts moving
02_split.jpg
02_split.jpg (430.3 KiB) Viewed 3198 times


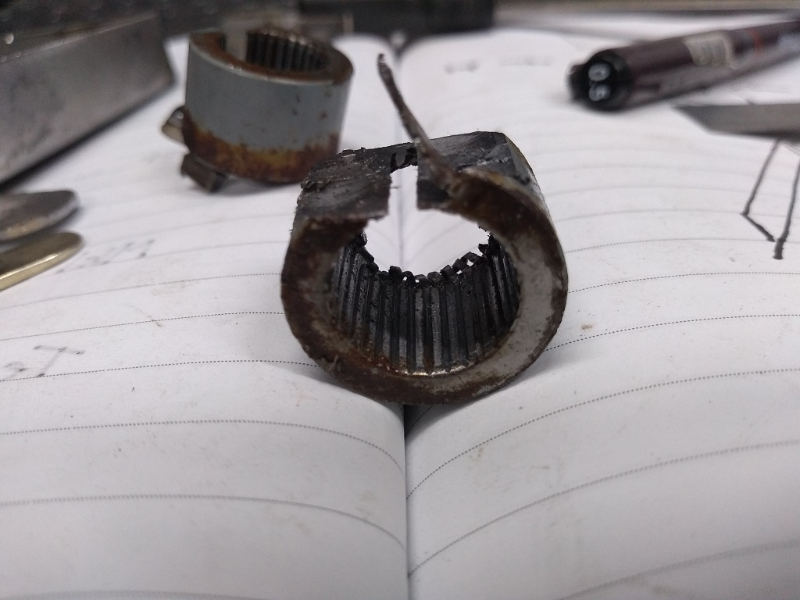
The cup came off pretty well as the interference fit was relieved
03_5_cup.jpg
03_5_cup.jpg (300.99 KiB) Viewed 3198 times


The extracted stud unit. This probably looks now how it would have done in assembly. Bit less rust then! :-D

03_tidied.jpg
03_tidied.jpg (353.22 KiB) Viewed 3198 times


The studs themselves are actually one part, which was unexpected. I would guess these are high tensile bolts, probably 10/12.9. I don't have the ability to remake these
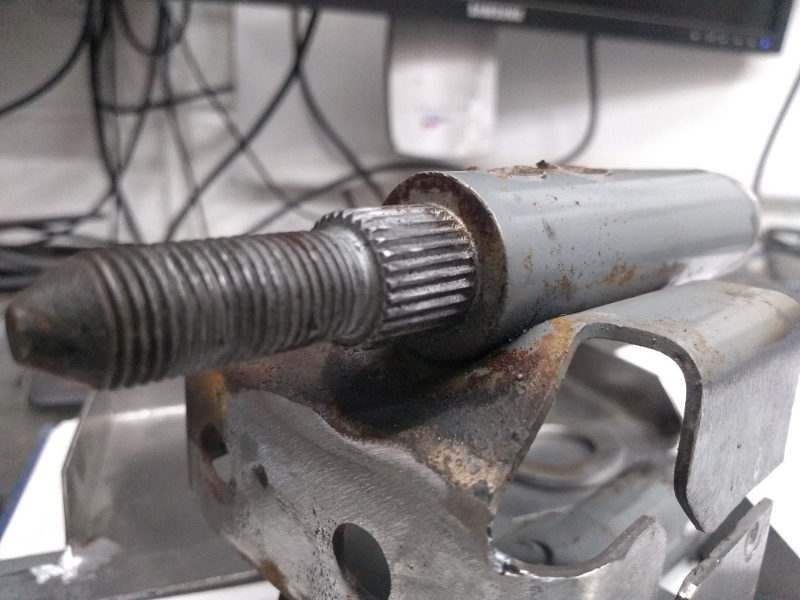
04_close.jpg
04_close.jpg (357.03 KiB) Viewed 3198 times


"spline" major diameter, it's an odd size but there's certainly a reason. From measurements on the mating part I'm going to try something IRO 15.3mm female size when i remake the base plate
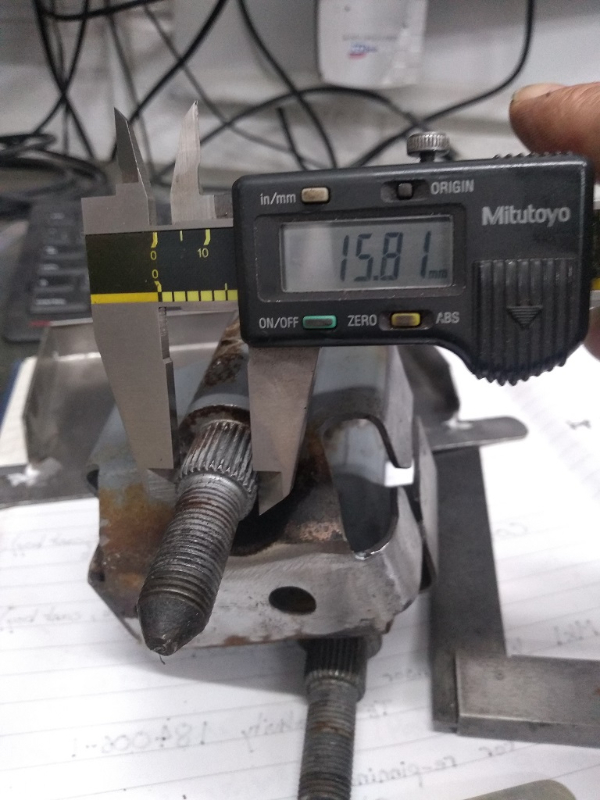
05_spline_dia.jpg
05_spline_dia.jpg (335.83 KiB) Viewed 3198 times


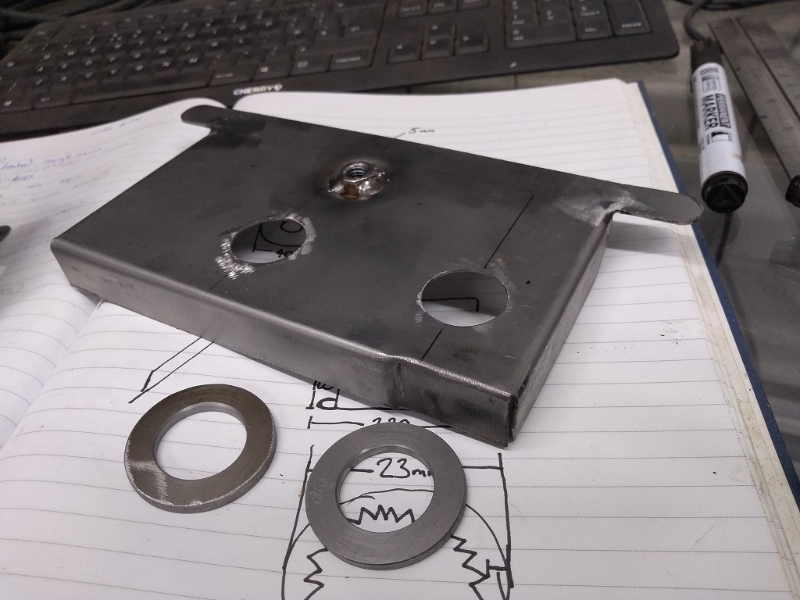
Remade the panel that goes between the strut tower arms, I used 1.5mm steel as the original. A pair or 3mm washers for same reason

06_cap_top.jpg
06_cap_top.jpg (341.72 KiB) Viewed 3198 times

07_cap_bottom.jpg
07_cap_bottom.jpg (339.21 KiB) Viewed 3198 times


As shown I only bothered to do one 4mm raised dimple with an 8mm captive nut behind for the washer bottle. There's two on the original plus a raised mounting lug (I think for the OEM air box..?) but i only used the one so i only made the one - "CBA" etc :-D

I just used a bit of nylon with a recess machined and then an alu punch with a pin for registration. Drilled an 8mm hole and then whack-whack-whack etc

08_dimple.jpg
08_dimple.jpg (326.29 KiB) Viewed 3198 times


This is the assembly put together, on the rusty old rail and on the new panel

09_assy.jpg
09_assy.jpg (373.04 KiB) Viewed 3198 times
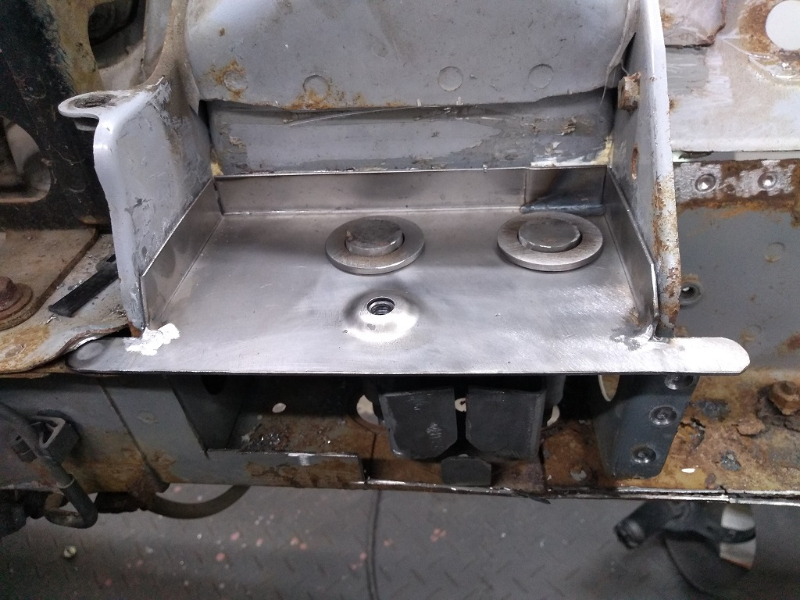

10_car.jpg
10_car.jpg (423.86 KiB) Viewed 3198 times
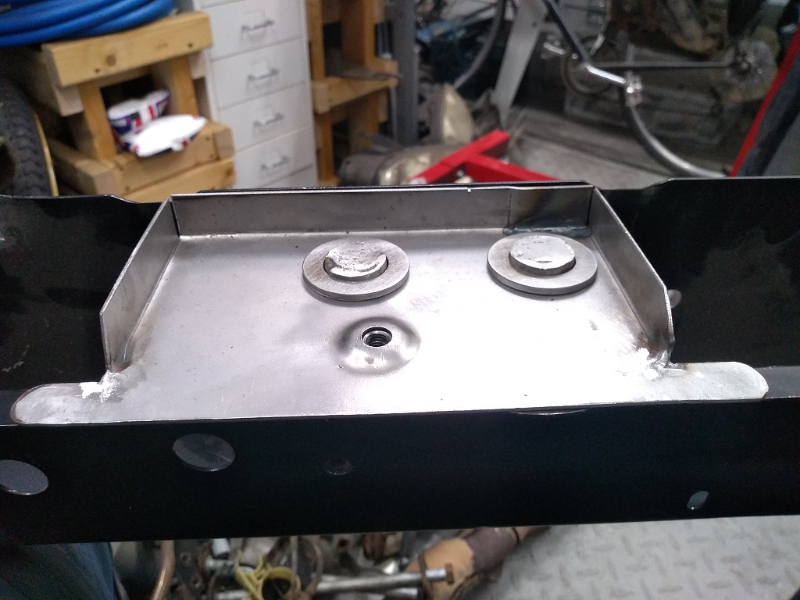

11_new_panel.jpg
11_new_panel.jpg (375.34 KiB) Viewed 3198 times


I was feeling a bit daunted by this part but I think it's going OK.

I haven't seen anyone do this before so hopefully someone else might get information from the pictures of what it looks like
User avatar
blackyb
Moderator
Posts: 1528
Joined: Tue Sep 17, 2013 8:41 pm
Location: Scarborough

Re: 2002 Arizona Rebuild

Postby blackyb » Mon Mar 13, 2023 5:50 pm

Done well, certainly maintaining the Menders ethos.
1993 1.6 Eunos Roadster (gone)
1998 UK Mk 2 1.6 (gone)
2003 1.8 SVT Sport (shouldnt have sold it)
1991 1.6 Eunos Roadster with a bit of bling.

Life is a journey, best travelled topless in an MX5!!
User avatar
Lumphammer
Moderator
Posts: 316
Joined: Thu Nov 15, 2012 10:57 pm

Re: 2002 Arizona Rebuild

Postby Lumphammer » Sun Jun 25, 2023 6:10 pm

Don't have so much time at the moment but had today hacking out rust and got the replacement rail test fitted in place

03_test_fit_rail.jpg
03_test_fit_rail.jpg (490.78 KiB) Viewed 2822 times


I machined two new cups and cut a base plate for the replacement subframe mount. I chose a bore of 15.25mm and the height of the cups of 15.50mm. The OD of the cups is 23mm which is the same as the original. I made a brass thingy to register the bore with the 12.5mm bore in the 5mm base plate, the spacing between the two base plate holes is 70mm which is critical.

The bore is a guestimate.. I have access to a 20 ton press, i hope that's enough - I'm trying to recreate a part I can't buy and cant get data on so.. :???: dunno..

01_plate.jpg
01_plate.jpg (409.57 KiB) Viewed 2822 times


Given it's 5mm plate and a critical part i asked a friend to TIG it, he did a cracking job. with the 45 degree chamfer i machined on it there's virtually no protrusion which is important because there's not much clearance on the pressing in the Mazda panel. Mazda electrically weld the cups to the plate, a chamfer and TIG was the closest I could do. I think it's good :lol:

04_fitment_of_plate.jpg
04_fitment_of_plate.jpg (423.22 KiB) Viewed 2822 times


The reason i'm doing this different to literally every other person is I don't like the way everyone else fixes MK2 chassis rail rust. Whilst i'm probably not the worlds most rounded person I like to think i'm not a total nucking futter either. This bit here where the brake line mounts to:

02_rusty_thing.jpg
02_rusty_thing.jpg (427.78 KiB) Viewed 2822 times


Is utterly festooned with rust, in the chassis rail behind the subframe mount is almost as gone as the front part that everyone replaces. Your can't see it, it's all on the inside, like the rust under the 5mm base plate, completely invisible
User avatar
Lumphammer
Moderator
Posts: 316
Joined: Thu Nov 15, 2012 10:57 pm

Re: 2002 Arizona Rebuild

Postby Lumphammer » Sun Jun 25, 2023 7:40 pm

For anyone rebuilding a rusty piece of junk, worth next to nothing, with no spare time, and having to plan for every minute of "garage time" :-D

never_give_up.jpg
never_give_up.jpg (459.95 KiB) Viewed 2819 times
User avatar
blackyb
Moderator
Posts: 1528
Joined: Tue Sep 17, 2013 8:41 pm
Location: Scarborough

Re: 2002 Arizona Rebuild

Postby blackyb » Sun Jun 25, 2023 10:45 pm

If a jobs worth doing take your time and do it once and do it right.
Never rush as rushing is going to lead to making mistakes.
1993 1.6 Eunos Roadster (gone)
1998 UK Mk 2 1.6 (gone)
2003 1.8 SVT Sport (shouldnt have sold it)
1991 1.6 Eunos Roadster with a bit of bling.

Life is a journey, best travelled topless in an MX5!!
User avatar
Mazda Mender
Site Admin
Posts: 15097
Joined: Tue Dec 06, 2011 6:18 pm
Location: Pie land, in the glen of Wiganshire
Contact:

Re: 2002 Arizona Rebuild

Postby Mazda Mender » Mon Jun 26, 2023 7:20 am

Lumphammer wrote:For anyone rebuilding a rusty piece of junk, worth next to nothing, with no spare time, and having to plan for every minute of "garage time" :-D

never_give_up.jpg


You love it :-D :handgestures-thumbup: :coffee:
M-m
The Disclaimer:-
This post is a natural product made from recycled electrons. The slight variations in spelling and grammar enhance its individual character and beauty and in no way are to be considered flaws or defects, the articles/answers/comments are provided for information purposes and they are not intended to substitute informed professional advice, I or mazdamenders.net cannot personally be hold responsible for any damage occurred from following this procedure or any injuries from it. Proceed at your own risk.


Mk 1 Eunos 93 black V.S II 1.8 ,
Mk 2 .1/4 Roadster 99 black & gold V.S 1.8 .
Mk 1 Eunos 90 1.6 soul red ..f/ build
MK 2.1/4 Blue V.S Roadster 1.8 99 ..
MK1 1.8 ,white import.. (Ashleighs)
MK1 1.6 yellow J ltd import.f/build
MK 1 1.8 black Tokyo Ltd..f/build


http://www.mx5oc.co.uk/ http://www.mx5nutz.com/forum/ http://miata.net/ http://www.autolinkuk.co.uk/
User avatar
Lumphammer
Moderator
Posts: 316
Joined: Thu Nov 15, 2012 10:57 pm

Re: 2002 Arizona Rebuild

Postby Lumphammer » Sat Jul 08, 2023 9:35 pm

All of this is 1.5mm steel as original. I think all the major structural forms are 1.5mm

The curved section that joins the frame rails, bulkhead and chassis rails had some bad rust under where the chassis rail mounts. Cut out the rust and made some new bits to go in

01_bulkhead_curve_cut.jpg
01_bulkhead_curve_cut.jpg (400.43 KiB) Viewed 2746 times


02_bulkhead_curve_replaced.jpg
02_bulkhead_curve_replaced.jpg (407.29 KiB) Viewed 2746 times


Remade the piece that joins the frame rail to the chassis rail, it has the bracket where the hardlines go to the flexi for the brake. It's got a funny curve on the engine bay side

03_chassis_rail_join.jpg
03_chassis_rail_join.jpg (402.78 KiB) Viewed 2746 times


After a bit of persuasion got the joins nice

04_chassis_rail_piece.jpg
04_chassis_rail_piece.jpg (405.15 KiB) Viewed 2746 times


Welding the existing bracket back on. It's pretty thick steel so i used 10mm plug welds to get penetration. Linished it back both sides

05_flexi_bracket.jpg
05_flexi_bracket.jpg (397.44 KiB) Viewed 2746 times


Fitment is OK, the bracket needs a bit of hammering down i think i clamped it slightly squiffy

06_piece_fitment.jpg
06_piece_fitment.jpg (357.91 KiB) Viewed 2746 times


Painted the whole lot in some weld through because i had some mixed up. It'll do to keep it from rusting but before it goes on i'll media blast and put some epoxy on the non-mating surfaces instead.

07_red_gunk.jpg
07_red_gunk.jpg (390.69 KiB) Viewed 2746 times


I'm not going to fit these until after the arms and everything else is welded in because with them off i can get some good clamping between the rail to the lower mounting piece. They need some plug weld holes drilling too, obviously!

Return to “Members Mx-5/ Roadsters”

Who is online

Users browsing this forum: No registered users and 13 guests