What you put in, you'll get back ten fold
***** THIS IS VERY IMPORTANT TO THE SITE AND HELPING YOU,OTHERWISE IT CLOSES AND ALL THIS ON LINE GARAGE IS GONE FOR GOOD*****

Greetings and welcome to menders, this site was built for every owner that might need her to help keep those bills low and also keep them on the road where they belong, she is run by very passionate enthusiasts owners for passionate enthusiastic owners, see her like a on line garage, there is a lot of tech stuff hopefully explained for everyone to use, if there is something you cannot get your head around, or you feel that there is a strong walk through guide missing that needs creating by one of us or from yourselves, please let us know, we are also on false book and youtube, which as short tech vids to help, and again if you feel there is a vid that would help please get it touch.
the menders is free, but like everything there is a cost to run things and bills( we are just happy its not a heating cost), so if we have saved you hundreds, please throw a small donation in the pot so we can keep on going to carry on helping others in the same way .

*** we are currently looking for a sponsor for this year, so if you have the passion and can see this sites worth to everyone , please get in touch and step forward to help***

And thank heavens that we are now on the way back up the brighter ,warmer longer days, "come on summer", and lets see those project builds.


M-m

2002 Arizona Rebuild

A place for members to show off their pride and joy. Also room to document your projects.
User avatar
Mazda Mender
Site Admin
Posts: 15097
Joined: Tue Dec 06, 2011 6:18 pm
Location: Pie land, in the glen of Wiganshire
Contact:

Re: 2002 Arizona Rebuild

Postby Mazda Mender » Sat Jul 08, 2023 11:33 pm

:handgestures-thumbup: :coffee:
M-m
The Disclaimer:-
This post is a natural product made from recycled electrons. The slight variations in spelling and grammar enhance its individual character and beauty and in no way are to be considered flaws or defects, the articles/answers/comments are provided for information purposes and they are not intended to substitute informed professional advice, I or mazdamenders.net cannot personally be hold responsible for any damage occurred from following this procedure or any injuries from it. Proceed at your own risk.


Mk 1 Eunos 93 black V.S II 1.8 ,
Mk 2 .1/4 Roadster 99 black & gold V.S 1.8 .
Mk 1 Eunos 90 1.6 soul red ..f/ build
MK 2.1/4 Blue V.S Roadster 1.8 99 ..
MK1 1.8 ,white import.. (Ashleighs)
MK1 1.6 yellow J ltd import.f/build
MK 1 1.8 black Tokyo Ltd..f/build


http://www.mx5oc.co.uk/ http://www.mx5nutz.com/forum/ http://miata.net/ http://www.autolinkuk.co.uk/
User avatar
Lumphammer
Moderator
Posts: 316
Joined: Thu Nov 15, 2012 10:57 pm

Re: 2002 Arizona Rebuild

Postby Lumphammer » Sun Jul 23, 2023 7:46 pm

Got a bit done over the past couple of wekeends. Fixed a lot of little things i cut out - like this shock tower brace that lives in the chassis rail - the bottoms rot off so just remade them

01_fix_things.jpg
01_fix_things.jpg (497.01 KiB) Viewed 1039 times


The subframe mounting base plate is a fairly critical part so wanted to test how well i could do plugs of 5mm plate onto 1.5mm. Welded a some scrap together

02_test_deep_plug.jpg
02_test_deep_plug.jpg (432.62 KiB) Viewed 1039 times


Then hammered it apart, rotating it which is very rough. 1.5mm tore out - i think that's good

03_test_destroyed.jpg
03_test_destroyed.jpg (399.89 KiB) Viewed 1039 times


Did the real ones of the base plate onto the large chassis rail, there's 6

04_base_plate_top.jpg
04_base_plate_top.jpg (419.62 KiB) Viewed 1039 times


05_base_plate_bottom.jpg
05_base_plate_bottom.jpg (451.84 KiB) Viewed 1039 times


Dressed it back and put red gunk on it to stop it rusting

06_base_plate_dressed.jpg
06_base_plate_dressed.jpg (382.46 KiB) Viewed 1039 times


Pressed the subframe studs assembly into it. Used my friends 10 ton press, worked beautifully, next to no increase in diameter of the cups despite the massive interference so i think the guestimate worked - it did recut splines into the cups as it was pressed in. Hard to understate how relieved i was with this! :-D

07_press_subframe_assy.jpg
07_press_subframe_assy.jpg (523.9 KiB) Viewed 1039 times


Needed to fix the bulkhead reinforcement plate, i had to hack it up to get the show tower parts out intact - they were the more important parts. I love using ply as a form for stretching and shrinking, it's hard enough to hold a form but soft enough to not strech the metal when you hit it

08_bash_wood.jpg
08_bash_wood.jpg (494.78 KiB) Viewed 1039 times


Bashed part, it just takes the form of the ply

09_bashed_wood.jpg
09_bashed_wood.jpg (475.9 KiB) Viewed 1039 times


10_curved_part.jpg
10_curved_part.jpg (338.84 KiB) Viewed 1039 times


This is where it ended up

11_fixed_thing.jpg
11_fixed_thing.jpg (456.28 KiB) Viewed 1039 times


And the pointless bracket put back on

12_fixed_thing_with_washer_bracket.jpg
12_fixed_thing_with_washer_bracket.jpg (429.33 KiB) Viewed 1039 times


All chassis leg components jammed and clamped in i did a final fit of the subframe to check it all lined up. It did and to make sure i got it back in the same position i drilled a few 3mm register holes where all panels lapped

13_test_fit_subframe.jpg
13_test_fit_subframe.jpg (486.82 KiB) Viewed 1039 times


Removed for final prep - so many plug weld holes!!

14_goddamn_plugs.jpg
14_goddamn_plugs.jpg (497.64 KiB) Viewed 1039 times


Prepared the inner parts, didn't use epoxy because it's too thick, needed to be flush for strength. The red gunk is thin

15_final_prep.jpg
15_final_prep.jpg (469.63 KiB) Viewed 1039 times


Assembled the inner chassis leg inside the outer and did the underneath plug welds. Didn't do the sides like this because i wanted to have some flex in the part to adjust it etc

16_lower_twin_layer.jpg
16_lower_twin_layer.jpg (453.5 KiB) Viewed 1039 times


Small thing i forgot to mention - to be able to take the leg in and out for fitment and prep a notch had to be cut in the strut brace. Put the corresponding male protrusion back on the part

17_fixed_shock_mount.jpg
17_fixed_shock_mount.jpg (383.32 KiB) Viewed 1039 times


Ready for final fitting

18_ready_to_weld.jpg
18_ready_to_weld.jpg (481.42 KiB) Viewed 1039 times


Welding was uneventful. I've got the plug weld settings for 1.5mm to 1.5mm pretty dialed into memory :lol: - took a bloody long time tho!

Next to none of this is dressed yet

Strut tower

19_shock_tower.jpg
19_shock_tower.jpg (439.29 KiB) Viewed 1039 times


Outside

20_outer_side.jpg
20_outer_side.jpg (439.33 KiB) Viewed 1039 times


The end of the frame rail to chassis rail continuation piece with the brake line bracket on it

21_little_bracket.jpg
21_little_bracket.jpg (416.81 KiB) Viewed 1039 times


Welded with the top cap pieces on

22_welded_layup.jpg
22_welded_layup.jpg (492.38 KiB) Viewed 1039 times


I'm quite happy with how it went, it's a lot of work tho
User avatar
blackyb
Moderator
Posts: 1528
Joined: Tue Sep 17, 2013 8:41 pm
Location: Scarborough

Re: 2002 Arizona Rebuild

Postby blackyb » Mon Jul 24, 2023 11:47 am

:obscene-drinkingcheers: given me something to read as I watch the rain fall down yet again.
1993 1.6 Eunos Roadster (gone)
1998 UK Mk 2 1.6 (gone)
2003 1.8 SVT Sport (shouldnt have sold it)
1991 1.6 Eunos Roadster with a bit of bling.

Life is a journey, best travelled topless in an MX5!!
User avatar
GlennyGills
Moderator
Posts: 630
Joined: Tue Jul 10, 2012 8:13 pm
Location: Reading

Re: 2002 Arizona Rebuild

Postby GlennyGills » Tue Jul 25, 2023 3:33 pm

Are you building a 3D jigsaw or a car? - great skills
'96 Gleneagles MeisterR Coilovers - engine bling stainless mx5parts full exhaust
User avatar
Lumphammer
Moderator
Posts: 316
Joined: Thu Nov 15, 2012 10:57 pm

Re: 2002 Arizona Rebuild

Postby Lumphammer » Sun Oct 01, 2023 6:27 pm

It's been a while since i posted anything, struggling with time and energy being a parent sleep deprived and feeling dreadful most of the time!

I've decided that i should do something interesting with the car, i thought about putting a supercharger on it, or maybe ITB's but in the end wanted something a bit more radical. I decided on the Toyota UZ engine because it's available, (relatively) affordable and it's a pretty good engine.

Desipite being a 4.0 V8 it's an all aluminium engine, DOHC and pretty compact. It's also from the generation of Japanese engines which were insanely overbuilt.

The Mazda B-series isn't a bad engine but it's fairly heavy for what it is, the UZ isn't much heavier, i believe 50kg

I bought this 1UZ-FE via marketplace for ÂŁ300, which is exceptionally cheap because the seller had totally dismanted it to do a full build and then had to abandon his project because of personal circumstances. No one wants an already dismanted engine.. hence the price. I bought it assuming it'd be a good space model at worst and for the money it was still worth it.

Turned out the seller was meticulous in how he'd taken everything apart, and the engine was in really good condition for a 140k engine - minimal bore wear, ring ridge, journal wear etc so i think this is viable to be rebuilt (fingers crossed)

This is the block

01_1UZFE.jpg
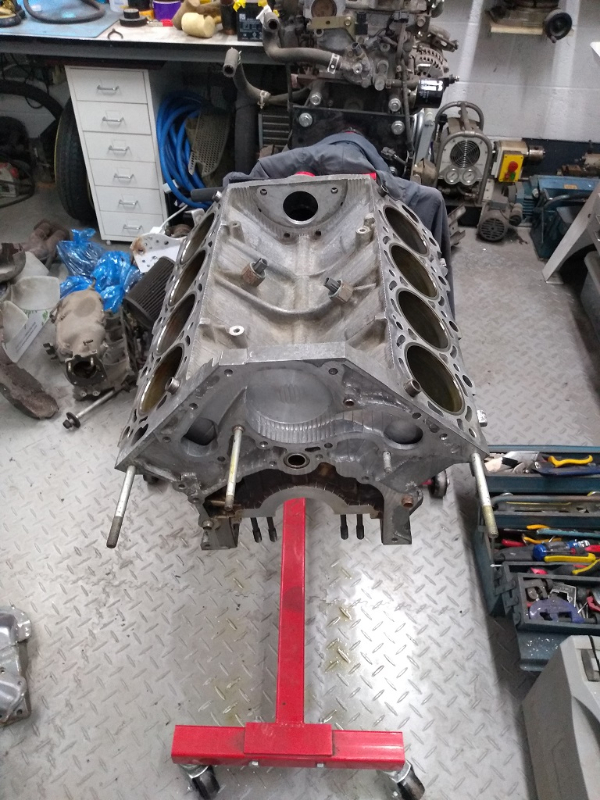
01_1UZFE.jpg (472 KiB) Viewed 791 times


Heads

02_heads.jpg
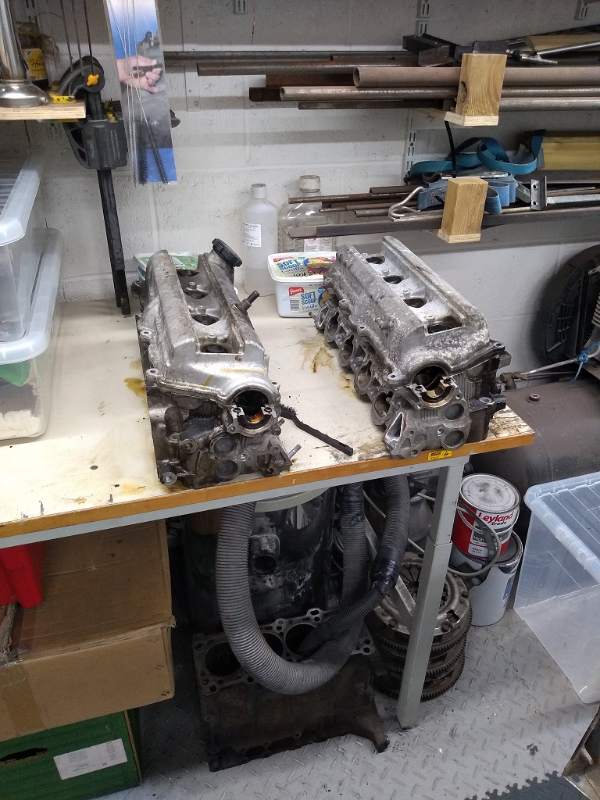
02_heads.jpg (473.03 KiB) Viewed 791 times


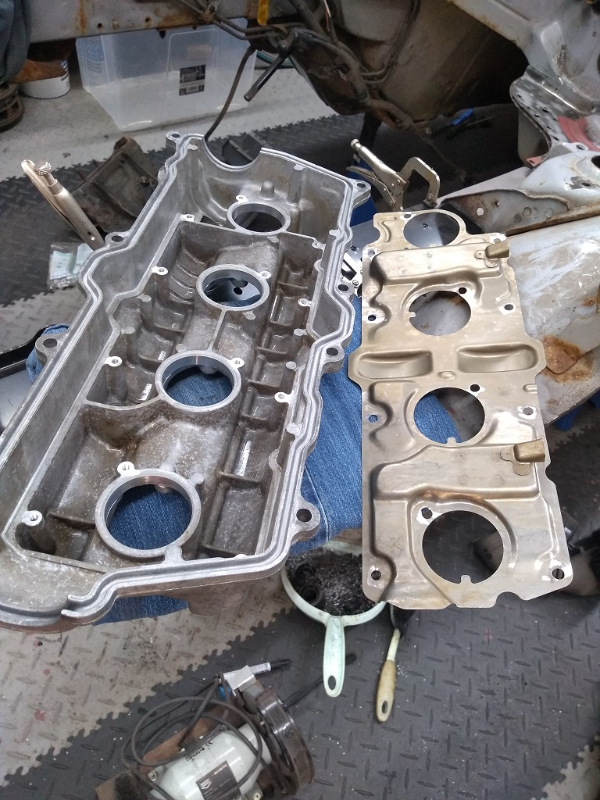
Had a mild case of the black death in the upper engine. removed the rocker cover baffles by grinding down the peened over castings. I've tapped the holes so i can screw on the baffles later on

04_gunk.jpg
04_gunk.jpg (477.35 KiB) Viewed 791 times


Bought a 27l heated ultrasonic tank to clean as many parts myself as possible

05_tank.jpg
05_tank.jpg (380.12 KiB) Viewed 791 times


They work really good, not as effortless as in the videos but still very good

06_cleaned.jpg
06_cleaned.jpg (501.94 KiB) Viewed 791 times


I've cleaned lots more parts and the engine is currently with an engine machininst - i'm having the deck and heads minimally resurfaced, just enough to get a perfect mating surface. Lastly they're doing a rigid fixture hone on the bores, i'll be replacing the rings so this is necessary. I contemplated doing the honing myself but a rigid fixture hone (like the Sunnen they have) ensures consistency and registration, tbh it wasn't worth not doing

Head and block in the junk heap focus, god knows how this thing keeps running..

07_focus.jpg
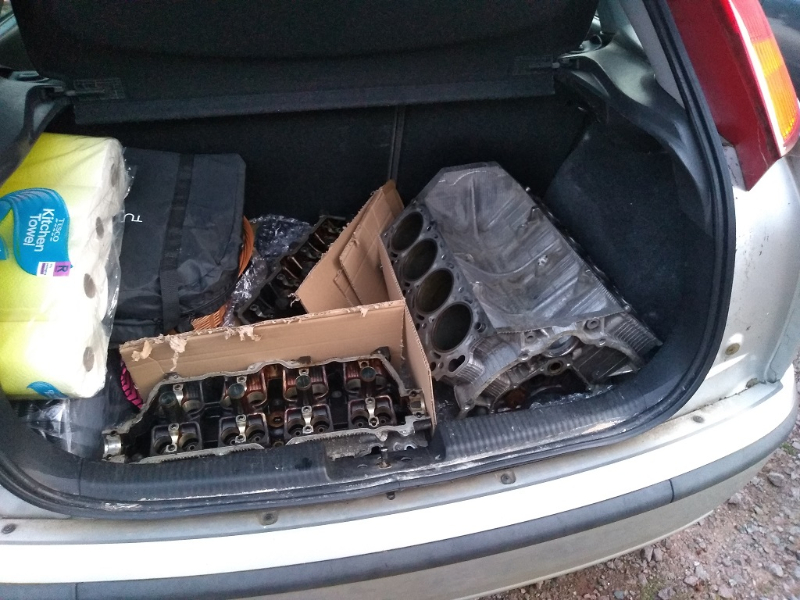
07_focus.jpg (454.02 KiB) Viewed 791 times


The Mazda gearbox won't be able to handle the torque produced so I decided to got for a ZF 6-speed box from a BMW 530i, this box is a GS6-37BZ. I chose a petrol "B" 'box because the 1st and 2nd gear ratios are slightly better than the diesel "D" boxes. They're regarded as being overbuilt and capable of carrying double the rated torque. It allows me to use fairly common "performance" BMW single plate clutches and the shifter linkage length can be readily changed by varying the bar - shifter length to fit in the MX-5 tunnel

03_GS6-37BZ.jpg
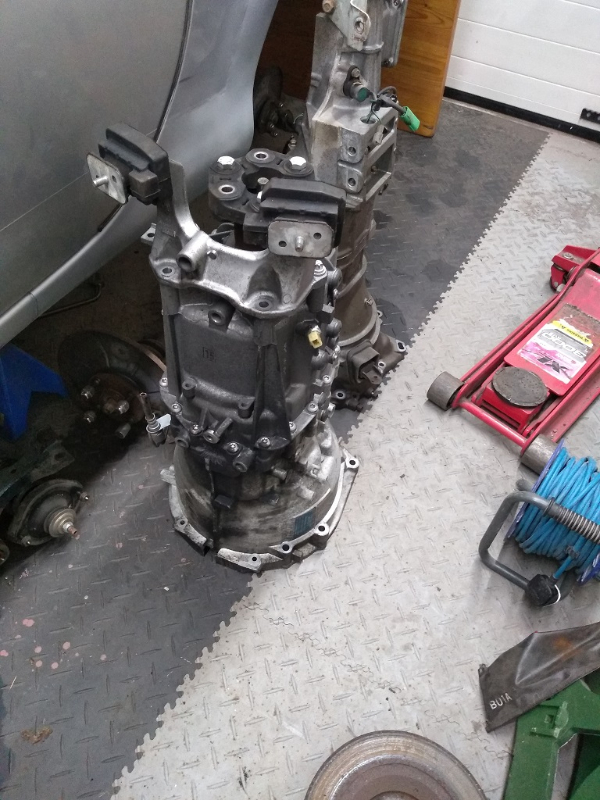
03_GS6-37BZ.jpg (432.74 KiB) Viewed 791 times


To connect the 1UZ to the ZF box i'll need an adapter plate and either a spacer or a custom flywheel

To make it more stupid i'm planning to use a pair of Garret 2554 or 2560 turbos, one per bank. I would prefer to use a newer generation of turbo but the cost becomes a lot and both the above turbos should spool quickly.

I need to consider the diff, the curent 1:4.1 Torsen type-2 is both the wrong ratio and won't handle the torque. It'll possibly be a BMW derived differential but i want to get the front of the car done first
User avatar
blackyb
Moderator
Posts: 1528
Joined: Tue Sep 17, 2013 8:41 pm
Location: Scarborough

Re: 2002 Arizona Rebuild

Postby blackyb » Sun Oct 01, 2023 8:13 pm

I've seen a couple of V8 MX5s , but this is going to be a monster tail wagging beast.
1993 1.6 Eunos Roadster (gone)
1998 UK Mk 2 1.6 (gone)
2003 1.8 SVT Sport (shouldnt have sold it)
1991 1.6 Eunos Roadster with a bit of bling.

Life is a journey, best travelled topless in an MX5!!

Return to “Members Mx-5/ Roadsters”

Who is online

Users browsing this forum: No registered users and 15 guests