Change of heart today. I thought id share a tip with you on how to change the lower ball joint rubber.
First cut away the top part of the rubber so you can see what your doing.
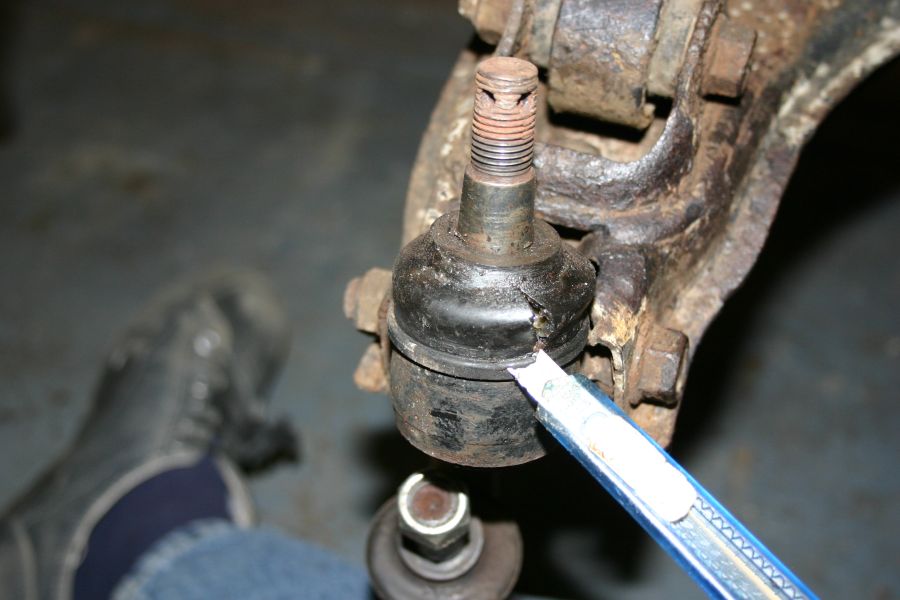
- IMG_4437.JPG (71.46 KiB) Viewed 11256 times
Then wipe away the surplice grease. This will remove any grime that may have got through the split in the rubber


- IMG_4439.JPG (57.01 KiB) Viewed 11256 times
Take a bit of tissue like this.

- IMG_4441.JPG (55.89 KiB) Viewed 11256 times
And push it around the shaft of the ball joint like so. This will stop anything else getting into the grease.

- IMG_4442.JPG (49.61 KiB) Viewed 11256 times
Place a screwdriver under the bottom lip & give it a gentle tap.

- IMG_4443.JPG (45.68 KiB) Viewed 11256 times
And remove the remainder of the rubber.

- IMG_4444.JPG (56.15 KiB) Viewed 11256 times
Now for the tip. These are what you'll need.
A wast pipe straight connector 40ml like this. You can get one from any plumber supplier.

- IMG_4429.JPG (45.98 KiB) Viewed 11256 times
A hose clip big enough to go around the above fitting.

- IMG_4430.JPG (57.44 KiB) Viewed 11256 times
A flat bit of metal. Anything like this will do.

- IMG_4431.JPG (64.66 KiB) Viewed 11256 times
A G clamp.

- IMG_4432.JPG (109.37 KiB) Viewed 11256 times
Put the hose clip on the straight connector like this. Its important to leave about a 4ml gap from the end.

- IMG_4433.JPG (56.72 KiB) Viewed 11256 times
Remove the tissue from the joint.

- IMG_4446.JPG (50.13 KiB) Viewed 11253 times
Put some fresh grease around the ball joint. Don't over do it

as when its all fitted together the rubber will compress & the grease will have to go some where. It could also damage the new rubber.

- IMG_4447.JPG (69.2 KiB) Viewed 11253 times
Place the new rubber over where it wants to go.

- IMG_4449.JPG (61.1 KiB) Viewed 11253 times
Place the waste fitting over the rubber with the hose clip near to the joint. Place the steel plate over the top of the wast fitting & the G clamp like so.

- IMG_4434.JPG (61.12 KiB) Viewed 11256 times
Slowly tighten the G clamp & the edge of the waste fitting will push the rubber into place. Just to let you know the reason for the hose clip is to stop the waste fitting splaying out as the clamp is tightened & enough to not damage the new rubber. It works a treat.

- IMG_4435.JPG (57.73 KiB) Viewed 11256 times
JOB DONE

 />
/> />
/>  />
/> 


 So i better get my finger out on cleaning up & painting them areas
 To all for letting me know how to get that bolt out of the bottom one.