What you put in, you'll get back ten fold
***** THIS IS VERY IMPORTANT TO THE SITE AND HELPING YOU,OTHERWISE IT CLOSES AND ALL THIS ON LINE GARAGE IS GONE FOR GOOD*****

Greetings and welcome to menders, this site was built for every owner that might need her to help keep those bills low and also keep them on the road where they belong, she is run by very passionate enthusiasts owners for passionate enthusiastic owners, see her like a on line garage, there is a lot of tech stuff hopefully explained for everyone to use, if there is something you cannot get your head around, or you feel that there is a strong walk through guide missing that needs creating by one of us or from yourselves, please let us know, we are also on false book and youtube, which as short tech vids to help, and again if you feel there is a vid that would help please get it touch.
the menders is free, but like everything there is a cost to run things and bills( we are just happy its not a heating cost), so if we have saved you hundreds, please throw a small donation in the pot so we can keep on going to carry on helping others in the same way .

*** we are currently looking for a sponsor for this year, so if you have the passion and can see this sites worth to everyone , please get in touch and step forward to help***

And thank heavens that we are now on the way back up the brighter ,warmer longer days, "come on summer", and lets see those project builds.


M-m

How to (and how not to) remove MK1 MX5 door cards

dogrosie
Just Run In
Posts: 40
Joined: Thu Apr 11, 2013 7:33 pm

How to (and how not to) remove MK1 MX5 door cards

Postby dogrosie » Thu Jun 06, 2013 8:07 pm

Many thanks to Wayne (Mazda-Mender) and Niall (Paggers) for giving me a set of doorcards.
Door card guide for how to remove them. Here is a guide of how to remove door cards as my way of saying thanks.

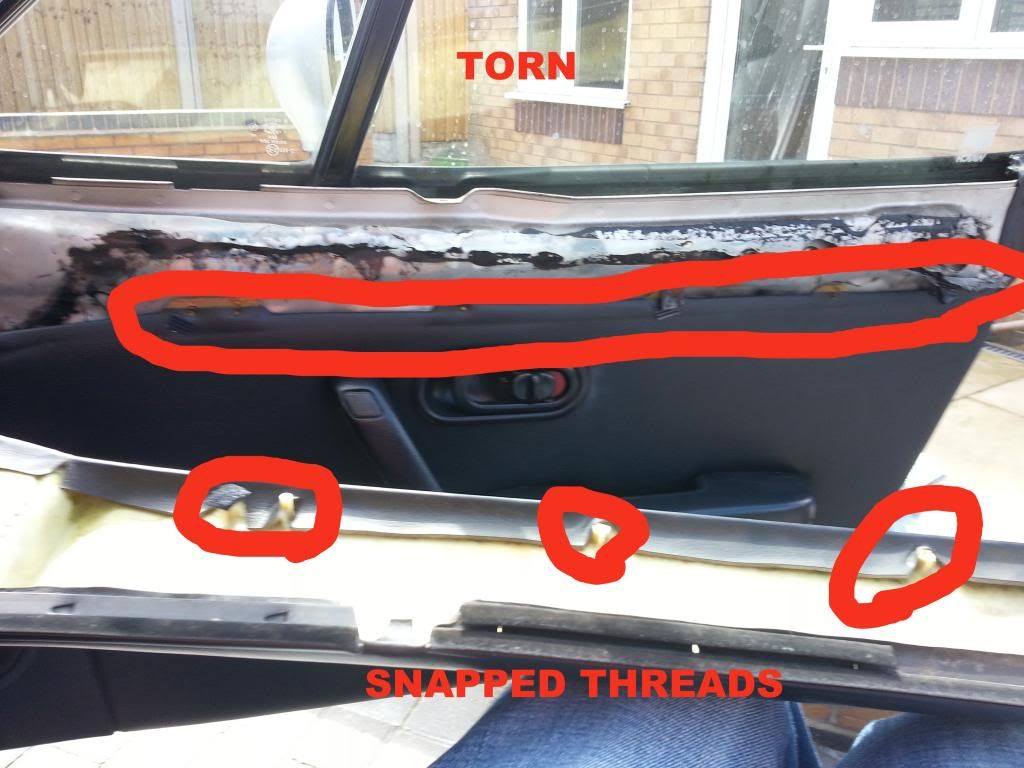
1. NEVER EVER pull the top of the door card off as it is bolted to the lower (main) section. Doing so will rip the cardboard door card, or worse will snap the threads off the top section.
This is not a step you must do, but more a point of telling you not what to do!
ImageImage

2. Let's get started! Pry off the diamond shaped screw cover on the door armrest with a flat-head screwdriver and undo the bolt, along with two other bolts. The door armrest should now come off by itself.
Then undo the screw on the door lock mechanism plastic surround. Then remove this surround. The door latch itself does not need to be removed just to remove the door card.
Image

3. Early MK1s only have a surround to the door speaker. This pulls off via 4 poppers and is far stronger than the rest of the door card. Id you don't have this then just skip this step.
Image

4. Now remove the door card itself. It is made from chipboard and is very easy to damage. Do NOT yank it off the door or it will rip all the poppers out of it, so you are left with the door card in your hands and all the poppers still in the door. Carefully pry off each popper with a flat object such as a ruler. A neighbour who has a '5 recommends using a fork with the prongs bent apart to completely surround the popper - Not tried it myself but I'm sure it would work well. Do not worry if you rip a popper off, as the door cards are fragile, especially if the plastic sheet is not present (explained further on). If there are a few poppers left in the door even though you have been careful, chances are that a previous owner did them - No big deal really as you can repair your door card with wood glue, or even make a new one yourself as they are only flat chipboard!

5. To refit the doorcard just put it back on in the same way you removed it :-) .
When you remove the door card there should be a plastic sheet almost the same size as the lower door card. This is to stop water touching the doorcard when it rains and runs down the window. If this is present then leave it be (unless you want to meddle with locks or leccy windows of course!). If it is not present, cut up a bin bag and stick in on. The black gunk is very sticky, but I found that one of my doors had some gunk missing, so I used some cheap all purpose sealant just to fill in a few small areas. If this sheet is not present then the doorcards get wet and will warp.

Mine before and after:
Before
Image

After
Image
I would like to fix my old cards (glue up card tears and retrim) by using the upper door cards off my new ones and some new fabric. I do quite like the OEM look!
1992 Eunos 1.6 in 3L silver.
User avatar
flea
Moderator Wannabe
Posts: 6618
Joined: Wed Dec 07, 2011 8:42 pm
Location: Medway towns, Kent

Re: How to (and how not to) remove MK1 MX5 door cards

Postby flea » Thu Jun 06, 2013 8:14 pm

:handgestures-thumbup:
Eunos 1.6 special 1989 with a few added extras
Eunos 1991 1.6
Eunos 1990 1.6 project
Mk2 1999 1.8
paggers
Serial Poster
Posts: 616
Joined: Sun Oct 14, 2012 9:42 am
Location: Warrington, Cheshire

Re: How to (and how not to) remove MK1 MX5 door cards

Postby paggers » Thu Jun 06, 2013 9:07 pm

Good to see those door cards going to good use. Well done on the fitting.
Niall


1997 1.8i Roadster in Black
- Induction kit, Stainless Exhaust System, Lowered Springs
1998 1.8i S MX-5 in Silver
- Under restoration

Also into taking a few pictures - check out my website.
User avatar
Creepy
Regular
Posts: 56
Joined: Mon Sep 28, 2015 8:49 pm
Location: South Manchester

Re: How to (and how not to) remove MK1 MX5 door cards

Postby Creepy » Wed Oct 07, 2015 1:51 pm

Great post and my first learning from the forum. Thanks for sharing :-)

Return to “MK1 -1989 > 1997 (NA)”

Who is online

Users browsing this forum: No registered users and 4 guests